Good Morning All and a very Happy Tuesday!
I've made a wall hanging for today's DT piece with a sentiment that I agree with totally! I'm planning on hanging it in my kitchen where I shall do my best to follow the advice!
Anyway, let's get started....
Paint a small wooden plaque with Cosmic Shimmer Midnight Matt Chalk Paint.
Ink up the "Life is Short" Singles stamp with Perfect Medium. Stamp onto the plaque and heat emboss with Cosmic Shimmer Bright Gold Metallic Powder.
Apply Perfect Medium Ink around the edges using a piece of Cut 'n Dry Foam. Heat emboss with the same powder as before.
Ink up the Cake and Spoon stamps from the A5 Vintage Cooking set with Perfect Medium and stamp several times onto Black Foundations Card. Heat emboss with the Bright Gold Powder and cut out.
Attach to the wall hanging with 3d foam pads.
Add some Golden Light Metallic Gilding Wax to the outer edge of the plaque.
Ink up the sentiment from the A5 Vintage Cooking Set with Perfect Medium and stamp onto Black Foundations Card.
Cut to size and glue onto a piece of Grungeboard.
Apply Perfect Medium Ink around the edges as before and heat emboss with Bright Gold Powder.
Attach to the plaque with Black Seam Binding.
Make a loop of Black Seam Binding and attach to the top of the plaque with Cosmic Shimmer Dries Clear Glue as a hanger.
And that's the finished project! Hope you like it.
I'm going to be having a couple of weeks off blogging over Christmas but I'll be back in the New Year with new stamps and ideas. Please pop back on January 6th to see what I've made!
In the meantime, have a Very Happy Christmas and a fab New Year. see you all soon..................
Good Morning All and a very Happy Tuesday!
I've finally had a chance to play with the gorgeous new stamps from Creative Expressions and here's my first one for the design team.
Squirt some very cheap Shaving Foam onto a plate. Level it out with a ruler then add drops of Dusty Concord and Broken China Distress Re-Inkers onto the shaving foam. Make swirly patterns in the foam.
Press a piece of Coconut White Card into the foam, lift off and remove the excess with a ruler. Wipe off any last bits with a piece of kitchen towel.
Ink up the Mix Things Up Singles stamp with Black Archival. Stamp over the swirly background then heat emboss with Cosmic Shimmer Clear Powder.
Distress the edges of the card with Dusty Concord Ink.
Matt an layer onto Coconut White and Black Foundations Card.
Stick onto the blank card. Stamp around the edges of the card with Black Archival Ink using the small sentiment and heart stamps from Creative Expressions A5 Vintage Cooking stamp set.
And there's the finished card!
Apart from the foam, everything used is from Creative Expressions.
I do love using the shaving foam technique but often forget about it! Sometimes it's good to re-visit old techniques!!
Well, that's it for today, I'll be back next Tuesday with another DT piece.
Have a happy, crafty week!!
Good Morning all and a Very Happy Tuesday!
Another project this week using products from Creative Expressions. I always love it when I get new stamps from them to play with and the new dance stamps are no exception.
I've made a wall hanging for this weeks project as I wanted to make a little Xmas gift for a friend...here's hoping she likes it!
Anyway, let's get started......
Cover a Pronty Wall Plaque with Couture Creations 12x12 Damask Paper. Paint around the edges with Black Soot Distress Paint.
Place the Sunrise Mask over the top half of the plaque. Dab through the mask with Flake and Glitter Glue.
Remove the mask then apply Cosmic Shimmer Aurora Lights Gilding Flakes.
Dab the glue around the edges of the plaque then apply more of the Gilding Flakes.
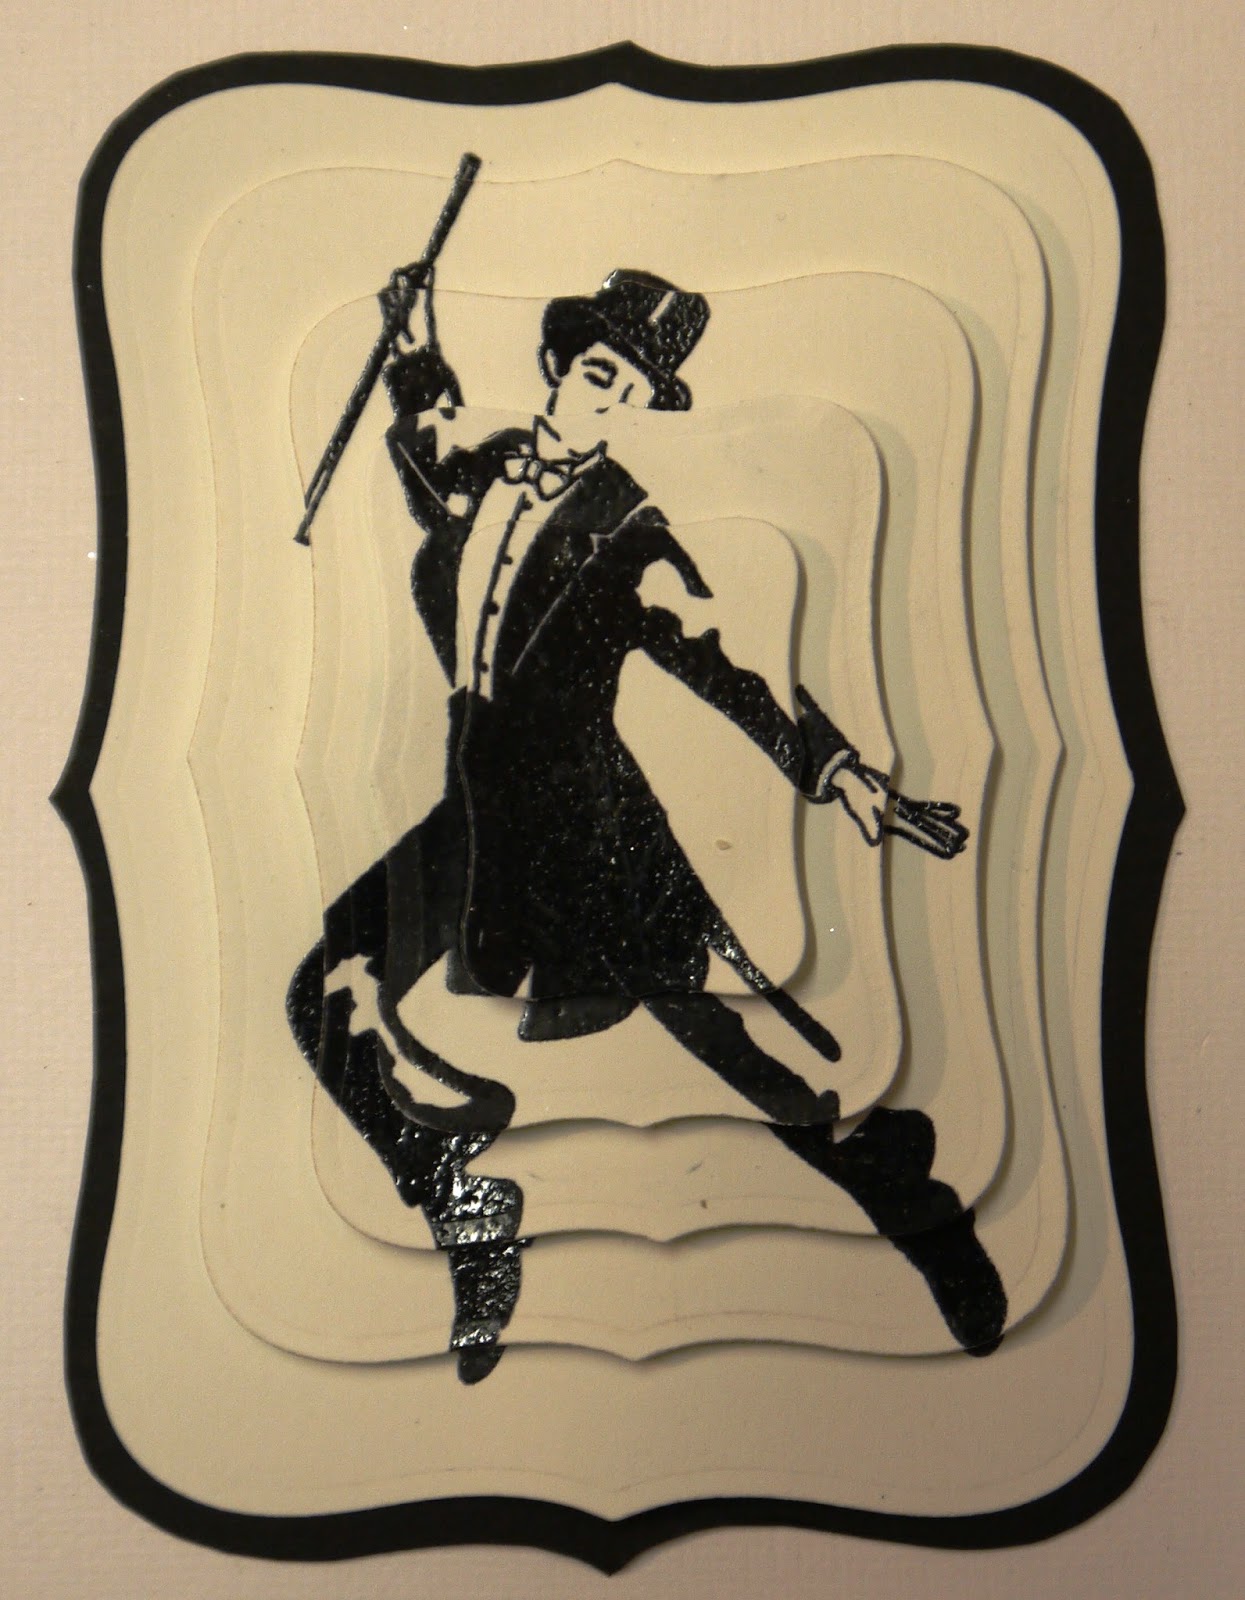
Ink up the "Top Hat and Tails" Singles Stamp with Black Archival Ink and stamp 5 times onto Coconut White Card. Heat emboss with Cosmic Shimmer Clear Powder.
Die cut the stamped images with Spellbinders 8 Labels.
Position them so that the image is cut with an even border each time but getting progressively smaller.
I hope that the picture explains what I mean!
Draw around the largest die used onto Black Card then cut out. Glue the largest of the dancers images onto the black card, then build up the layers using 3d foam pads.
Ink up the sentiment from the A5 "Step by Step" Stamp Set with Black Archival. Heat emboss with Cosmic Shimmer Clear Powder.
Cut out with the Spellbinders Standard Circles Small Dies.
Draw around the outer edge of the die on black card then cut out as a matt.
Glue the dancer and sentiment onto the plaque.
Add Black Seam Binding as a hanger.
And that's the finished project...hope you like it!
Julia Watts has done such a good job using these stamps that I wanted to do something very different with them. Do go to her blog and take a look, there are some gorgeous cards using the dance stamps.
Well, that's it for today...can't believe that it's December already! Where has this year gone!!
So, until next time, have a happy, crafty week!