Good Morning All and a very Happy Thursday.
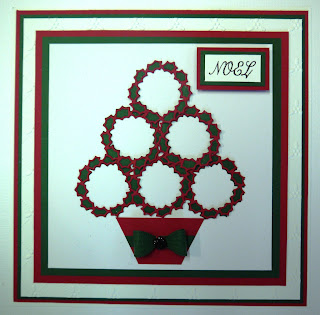
I've got another Christmas card for you this week that's quick to make and another way to use your Festive Collection - Christmas Joy Wreath Dies.
So let's get started.....
In the Die set, there are 2 holly dies, one is the main background die and the other is the overlay.
Die the cut the background holly using Foundations card Brunswick Green and the overlay from Foundations Ruby Card.
Cut 6 of these and glue together with Cosmic Shimmer Dries Clear Glue.
Glue the bottom layer of wreaths into position on a square of Coconut White Card. Slightly overlap the wreaths.
Add the next two rows still overlapping.
Cut a tree pot from a piece of the Ruby card. Add a strip of Brunswick Green across it.
Glue underneath the tree.
Emboss a larger square of Coconut White with the A4 Tied Holly Folder.
Matt and layer onto the Green and Ruby card.
Add the main image onto the card.
Die cut a bow using the Finishing Touches - Classic 3D Itty Bitty Bows from the same green card. Glue into shape then glue onto the pot.
Add a small Black Dazzler to the centre of the bow.
Ink up the Noel stamp from the Holly Wreath Elements Stamp Set with Black Archival Ink. Stamp onto Coconut White card. Heat emboss with Cosmic Shimmer Clear Powder.
Cut to size then matt and layer as before. Add to the card with 3d foam pads.
And there's the finished card! Hope you like it! The size of the blank card is 8x8.
While you're reading this, I'll be working on a ship in the Caribbean, in fact I'll be there until January 4th. I do have projects lined up for while I'm away so please stop by and take a look.
I'll be posting photos on Facebook of our travels and checking in on there, to let people know where we are. If you want to see, please add me as a friend...my name on there is Pam Smith.
Many thanks for stopping by and leaving comments. Everything used is from Creative Expressions.
Until next time, have a happy, crafty week!
About Me

- The Taming of the Glue
- Hi, I'm Pam and thank you for visiting my blog. I have been making cards for over 10 years and am an independent demonstrator for Creative Expressions. I am lucky enough to teach on cruise ships and also get the chance to demo at The Big Stamping and Scrapbooking Show at Alexander Palace. I run workshops for a local craft shop and if anyone would like details of the them please e-mail me at stephen.smith870@ntlworld.com I love to scrapbook but my all time favourite thing is to get messy with ink!
Thursday 26 November 2015
Thursday 19 November 2015
Let's Decorate!
Good Morning All and a very Happy Thursday!
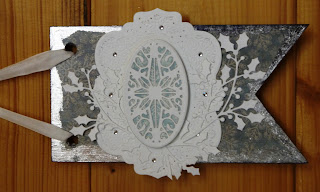
I've moved away from the cards this week and thought I'd make a decoration for the house instead.
I'll apologise in advance for the dodgy colours in the photos! The light was awful and everything looks a lot darker than in "real life".
Anyway, let's get started....
Cover a blank MDF banner shape with Craft Consortium Decoupage Paper using the Cosmic Shimmer Glossy Seal and Glaze.
Pick up some Flake and Glitter Glue on a piece of Cut 'n Dry Foam and dab around the edges. Apply Cosmic Shimmer Silver Moon Gilding Flakes.
Edge with Black Archival Ink.
Don't panic if you get a bit of ink on the banner as you'll be covering it up!
Die cut the Festive Collection - Deboss Snowflake from a piece of Coconut White Card.
Cover another piece of card with the decoupage paper and cut out the oval from the same set.
Cut out the oval and it's patterned centre from white card.
Layer the pieces up and glue into position
Add small Always and Forever Rhinestone Gems to the centres of the debossed snowflakes.
Die cut the Festive Collection - Holly Sprays from white card and glue into position.
And you're finished!
I hope you like it, it's very quick to make and you could make several and thread them together.
As always, everything used is from Creative Expressions.
Well, that's all for this week except to say thank you for visiting and leaving all of your lovely comments. I do hope everyone is safe after the awful weather we've been having.
I'll be back next week with another Christmas project so until then, have a happy, crafty week!
Thursday 12 November 2015
Frosted Trees
Good Morning All and a very Happy Thursday!
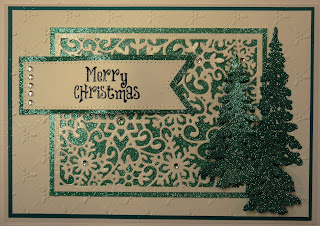
I've got another Christmas card to show you today that uses the Frosty Mini Background Die and glitter. If you can't use glitter this time of year, when can you!
Anyway, let's get started....
Die cut the Festive Collection - Frosty Mini Background from Coconut White Card.
Cut around the sides to make a rectangle.
Very strange light in the studio...but this is white...promise!
Apply some Flake and Glitter Glue to a piece of Cut 'n Dry Foam and dab over the die cut background.
Apply Cosmic Shimmer Glitter Jewels - Diamond Snow.
Place a piece of Double Sided Adhesive Sheet onto a piece of card.
Cover with Cosmic Shimmer Polished Silk Glitter - Ice Blue.
Cut to size and glue the die cut background over the top.
Emboss a piece of Coconut White card with the A4 Holly Lattice Embossing Folder.
Matt and layer onto a piece of Foundations Teal Card.
Attach the glittered background.
Die cut 3 trees from the Festive Collection - Winter Trees set and cover with the same Ice Blue Glitter as before.
Glue the first tree into position, flat, then add the others with 3d foam pads.
Place some double sided adhesive onto a piece of card then cut around the outer edge of the largest flag from the Frames and Tags - Pierced Flags. Cover with Ice Blue Glitter.
Die cut the same Pierced Flag using Coconut White card. Stamp the sentiment with Black Archival Ink then heat emboss with Cosmic Shimmer Clear Powder.
Matt and layer. Shape the flag and glue into position.
Add gems from the Always and Forever Wedding Collection - Rhinestones to the flag and some of the snowflake centres on the background.
And there's the finished card!
I'm afraid it's another one where I wish you could see it instead of a photo of it! Anyway, I hope you like it!
Well, that just leaves me to say a big thank you for visiting and leaving comments....all much appreciated.
Everything I've used is from Creative Expressions as always!
Until next time. have a happy, crafty week!
Thursday 5 November 2015
JOY!
Good Morning and a very Happy Thursday to you all!
A new month and a new set of goodies to play with! This month we're back to Christmas designs and to kick things off I've used the Festive Collection-Christmas Joy Wreath as the main element.
So let's get started.....
Cut a square of Foundations Ruby Card and a smaller square of Coconut White Card.
Ink up the Elegant Poinsettias stamp with Vermillion Archival and stamp randomly onto the white card.
De-boss the card using the A4 Holly Lattice Embossing Folder.
Emboss the Ruby card with the same folder. Matt and layer.
Die cut a matt from the Ruby card with the Portuguese Collection - Lisbon Dies and emboss with the Holly Folder.
Die cut the Festive Collection - Christmas Joy Wreath from Coconut White card. Cut the outline leaves from the Ruby card.
Glue the letters onto the die cut matt with Cosmic Shimmer Dries Clear Glue.
Add to the card with 3d foam pads.
Add Always and Forever - Wedding Collection small gems to the holly die and also to the centres of the stamped flowers.
Cut a length of Black and White Tulle. Lay them on top of each other and pleat fold them. Tie a knot in the centre and fan out the ends.
Attach to the card with a glue dot.
Add a Dazzler to the centre with a glue dot to finish.
And there's the finished card!
It's a quick and easy one to make and would be great for a male or female recipient. I hope you like it! I've used an 8x8 card for the base.
Well, that's it for this week. Many thanks for all the visits and kind comments.
I'll be back next week with another Christmas design. In the meantime, I'll be teaching at Martells this Saturday and, for anyone coming, it involves glitter so be warned!!!
Until next time, have a happy, crafty week!
Subscribe to:
Posts (Atom)


