Good Morning All and may I wish you a very Happy New Year!
We're back from the cruise which was great fun but when we got back I went down with the "dreaded lurgy" hence, no posting last week. Please forgive me, but I felt like death warmed up!
Anyway, let's get on with a nice quick and easy project for this week. It's a little tag I made using the Couture Creations 3 in 1 sets.
Start by covering a tag with the Creative Expressions "Teresa Collins" paper. Paint the sides and the back with Eco Green Black Acrylic Paint.
Use the doilies dies to cut shapes from the Teresa Collins Paper and build them up with 3d foam pads.
Cut out (by hand) some leaves and stems from the same paper pad. Draw dashes onto them with a fine black pen. Glue into place.
Glue the flowers on with Cosmic Shimmer Dries Clear Glue.
Add a Creative Expressions Cream Self Adhesive Pearl to the flower centres. Attach a piece of Cream Seam Binding to hang the tag.
Nice and simple and a good way to ease back into crafting after a break!
Now onto the blog candy.....we've reached the 300 mark and using my random number generator (my OH!), he has selected the number 296 and that is Angela Hartley. So Angela, please e-mail me and I'll get the candy in the post for you...many congratulations.
I'll be putting up a new candy in the next few days so please keep an eye open for it.
On the cruise we went to Jordan and I was finally able to see The Lost City of Petra. It was stunning and I've put a couple of piccies on here. Well worth a visit if you're ever anywhere near.
I'll be back tomorrow with a project for Creative Studios, hope you'll visit, but in the meantime, many thanks for stopping by today.
Good Morning All. Well, by the time you read this we'll be travelling back from Southampton after going on the Fred Olsen cruise to Israel and Jordan. It'll be quite a relief to get back and start on the Christmas preparations!
Today is my day for a project on the Creative Studios Design Team Blog and I thought I'd do something a little different. I've used a Layered Embossing Technique which I love. I've put the full step by step on the Creative Studios Blog. To get there, click on Sam Poole on the right.
So, here's the card.
I've used the Steam Punk Flowers A5 Stamp Set designed by Sam and also one of her fab A6 Background Stamps. Sam has a fantastic on-line shop and it's well worth a visit!
Well, many thanks for your visit and comments, they really are appreciated. Normal service will be resumed next week (yes, I know it's Christmas Day but I'll still post something!).
Until next time....keep crafting!
Good Morning All.
Isn't it strange how if we don't get good results the first time we use something, we assume we've done something wrong when that might not be the case!
Take my attempts at Mica Powders for instance. I always seemed to end up with a "bloom" which just looked messy. Of course, it had to be my fault as everyone else seemed to get fab results with them!
Well, I'm pleased to announce that I think I've finally "nailed it"!!
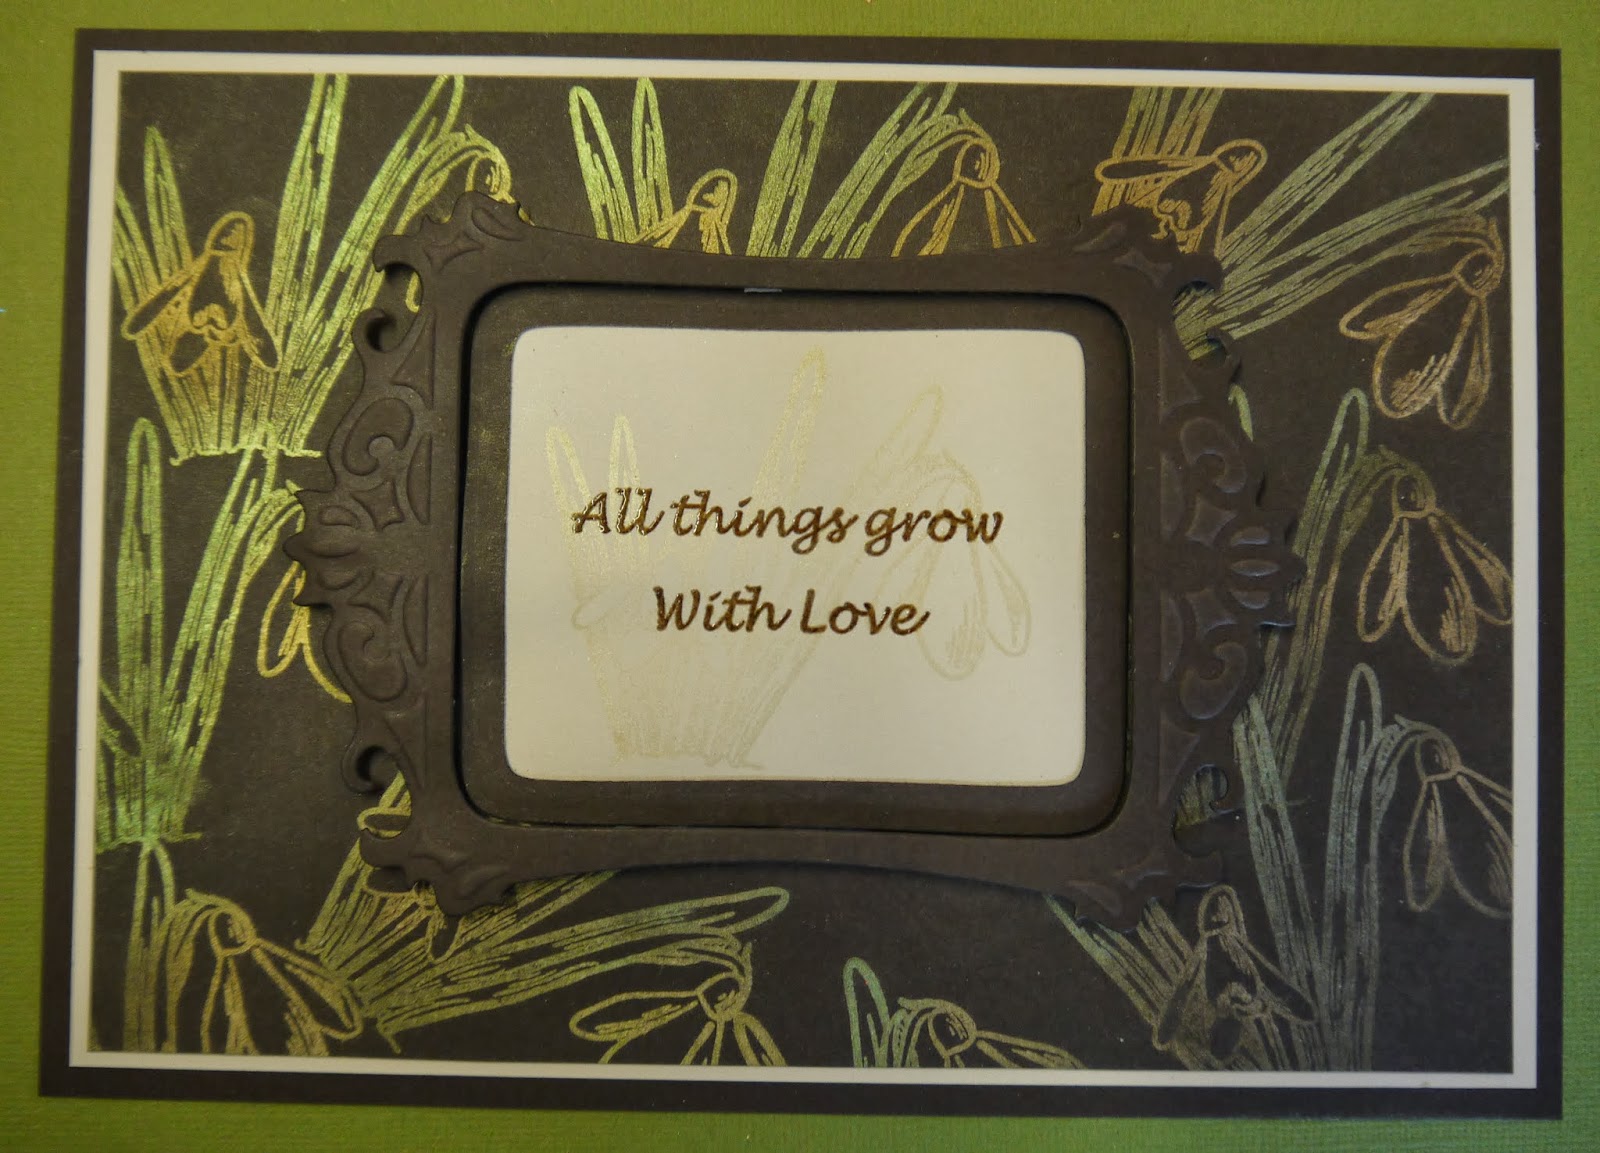
So without further ado, here is my Creative Expressions Design Team project for today.
Cut a piece of Dark Roast Coffee Cardstock to size and go over it with an anti-static pad.
Ink up the Snowdrop stamp with Perfect Medium Ink and stamp randomly onto the coffee card.
Dust over with Cosmic Shimmer Mica Powders in Gold Pearl and Green Pearl.
Matt and layer onto Foundations Milk Cardstock.
Die cut the Spellbinders Classic Frame in Coffee and Milk Cardstock.
Stamp the Snowdrop onto the centre of the Milk Frame with Perfect Medium and dust with the Mica Powders. Stamp the sentiment over the top with Coffee Archival Ink and heat emboss with Cosmic Shimmer Clear Embossing Powder. Glue into place with Cosmic Shimmer Dries Clear Glue.
Attach the outer frame with 3d foam pads.
Tie a double bow with Brown Crushed Satin Ribbon and add a Light Brown Dazzler to the centre. Attach to the card with a glue dot.
To make the flowers:
Paint some watered down Mica Powders on a piece of the Milk Cardstock. Dry then cut out flower shapes using the Heartfelt Creations Posy Patch Dies. Place the flowers into the Vintage Plumes Embossing Folder and run through the Grand Calibur.
Make the flowers up. Glue onto the card and add gems to the centres to finish.
So, what were my tips for the Mica Powders. Always use an anti-static bag. Secondly, the results do seem to vary with the quality of the card. The Foundations Cardstock worked perfectly for me.
That's all from me for today. I'll be home from the cruise tomorrow (I've been away since November 18th but I was determined to blog!).
Many thanks for your visit and comments, they are much appreciated. Until next time.....keep crafting!
Good Morning All. We'll be on our return leg of the cruise by today and I'm sort of looking forward to getting home and getting Christmas organised.
I think that after getting all the washing done, the next job will be putting the tree up. See, I'm already making lists! At least I managed to finish making all the Christmas cards before I came away. That leads me on to sharing with you a card I've made for the Creative Studios Design Team Blog (the link is Sam Poole on the right).
It's a very simple card but I think it's quite effective. If you'd like the step by step, please visit Sam.
Anyway, it's just a very quick post today. I'll be home soon and hopefully we'll have reached 300 followers and the draw for the blog candy can take place!
Until next time, keep crafting!
Good Morning All. It's nearly Christmas so it's the perfect time of the year to visit your local hostelry! Even if you don't drink, I have a great reason for going and that's beer mats!!
Todays Design Team project for Creative Expressions features beer mats that I "liberated" from a pub.
Here goes!
Cover 3 beer mats with Creative Expression Teresa Collins patterned paper. Distress the edges with Tea Dye Distress Ink.
Paint the sides and backs with Eco Green Black Acrylic Paint. Punch holes as shown.
Ink up a swirl from the Creative Expressions Mini Swirl stamp set with Black Archival Ink and use 2nd generation stamping on the beer mats.
Stamp the Christmas Rose and Snowdrop with Black Archival Ink onto Coconut White Cardstock and heat emboss with Cosmic Shimmer Clear Embossing Powder.
Paint the flowers with Spun Sugar and Tattered Rose Distress Inks and the leaves with Shabby Shutters and Peeled Paint. Cut out and stick onto the beer mats with Cosmic Shimmer Dries Clear Glue.
Stamp the name of the flower under each one.
Stamp the sentiment and heat emboss as before. Cut out and colour the card with the 2 shades of pink Distress Ink.
Matt and layer onto Foundations Black Cardstock.
Die cut the shapes from Spellbinder Fleur de Lis Accents dies and glue into place.
Colour some string to join the beer mats together and thread through the holes.
Stamp some 6 petal flowers from the Couture Creations 3 in 1 set onto Teresa Collins Paper. Cut out and distress the edges with Tea Dye Distress Ink.
Make up into 3d flowers and glue into place to finish.
So, off you go to the pub! I hope you've enjoyed this project. There are so many tutorials on 3d flowers that I haven't included one here. I know that Sue Wilson has a fantastic one on her "Particraft" blog (there's a link on the right). Until next time, keep an eye on the Creative Expressions blog and don't forget Fun Friday on the Creative Expressions Facebook page (there are prizes!)
Many thanks for visiting and leaving comments.
Good Morning All. Hope everyone is well and Christmas isn't causing too much stress!
I've definitely moved away from the Christmas theme with the card that I've designed for the Creative Studios Design Team Blog this week.
I've used the High, Low technique that the wonderful Sue Wilson showed me at Ally Pally back in September (that seems like a lifetime ago!).
I've put the full step by step instructions on the Creative Studios Design Team Blog. To get there, look on the left for the link to Sam Poole. I've also used her fabulous "Up, Up and Away" A5 stamp set.
Anyway, here's the finished card. Hope you like it.
I'm away on my travels at the moment but still blogging so please come back and see me again. I do appreciate your visits and also the comments.
I think we'll probably be up to 300 followers by the time I get back so I'll be able to do the draw for the Blog Candy.
Until next time, stay healthy and have a happy, crafty time!
Good Morning All!
Do you ever go through your craft stash and realise that you've got a product that was loved then pushed to one side? I recently tidied up (a miracle I know!) and found my fusible fibres. Well, I couldn't let an opportunity to use them again go by so, here they are in this weeks Creative Expressions Design Team piece.
Ink up the Christmas Rose from the Winter Flower Stamp Set with Black Archival Ink.
Place some Cosmic Shimmer Heat Bondable Angel Fibres in Enchanted Metallics over the top of the stamp.
Cover over with a piece of vellum (or baking parchment) and press down with an iron. Don't be tempted to move the iron around too much, just lift it and press down again. When the fibres have fused you'll be able to see the ink outline of the stamp.
Cut out the flower head.
Stamp the Christmas Rose again onto Coconut White cardstock with Black Archival Ink and heat emboss with Cosmic Shimmer Clear Powder. Paint the leaves and stem with Cosmic Shimmer Watercolours in Holly Leaf and Autumn Twist.
Die cut the Flower using Spellbinders Labels 28. Glue the Bondable Film Flower into place with Cosmic Shimmer Dries Clear Glue.
Die cut a matt.
Using the Creative Expressions A4 Tapestry Folder, emboss a piece of Coconut White Cardstock. Apply Patina Gilding Wax around the edges.
Matt and layer then glue the Flower element into place.
Tie a knot into a piece of tulle to make a "faux bow" then tie a double bow using the crushed satin ribbon.
Glue onto the card and add a Silver Dazzler to the centre of the bow to finish.
So get searching out all of your hidden treasures! You'll be surprised what you find!
Many thanks for your visit and comments and until next time...keep crafting!