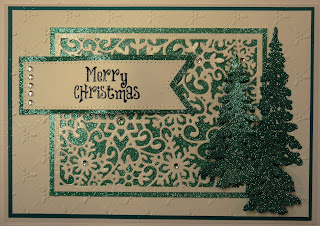
Good Morning All and a very Happy Thursday!
I've got another Christmas card to show you today that uses the Frosty Mini Background Die and glitter. If you can't use glitter this time of year, when can you!
Anyway, let's get started....
Die cut the Festive Collection - Frosty Mini Background from Coconut White Card.
Cut around the sides to make a rectangle.
Very strange light in the studio...but this is white...promise!
Apply some Flake and Glitter Glue to a piece of Cut 'n Dry Foam and dab over the die cut background.
Apply Cosmic Shimmer Glitter Jewels - Diamond Snow.
Place a piece of Double Sided Adhesive Sheet onto a piece of card.
Cover with Cosmic Shimmer Polished Silk Glitter - Ice Blue.
Cut to size and glue the die cut background over the top.
Emboss a piece of Coconut White card with the A4 Holly Lattice Embossing Folder.
Matt and layer onto a piece of Foundations Teal Card.
Attach the glittered background.
Die cut 3 trees from the Festive Collection - Winter Trees set and cover with the same Ice Blue Glitter as before.
Glue the first tree into position, flat, then add the others with 3d foam pads.
Place some double sided adhesive onto a piece of card then cut around the outer edge of the largest flag from the Frames and Tags - Pierced Flags. Cover with Ice Blue Glitter.
Die cut the same Pierced Flag using Coconut White card. Stamp the sentiment with Black Archival Ink then heat emboss with Cosmic Shimmer Clear Powder.
Matt and layer. Shape the flag and glue into position.
Add gems from the Always and Forever Wedding Collection - Rhinestones to the flag and some of the snowflake centres on the background.
And there's the finished card!
I'm afraid it's another one where I wish you could see it instead of a photo of it! Anyway, I hope you like it!
Well, that just leaves me to say a big thank you for visiting and leaving comments....all much appreciated.
Everything I've used is from Creative Expressions as always!
Until next time. have a happy, crafty week!
About Me

- The Taming of the Glue
- Hi, I'm Pam and thank you for visiting my blog. I have been making cards for over 10 years and am an independent demonstrator for Creative Expressions. I am lucky enough to teach on cruise ships and also get the chance to demo at The Big Stamping and Scrapbooking Show at Alexander Palace. I run workshops for a local craft shop and if anyone would like details of the them please e-mail me at stephen.smith870@ntlworld.com I love to scrapbook but my all time favourite thing is to get messy with ink!


7 comments:
That's lovely and looks fairly quick to make. Thanks for the idea.
Jan
Northampton
Hello hi Pam, I love this card, very bright and cheery. Thank you. X
A lovely card, Pam.
Anne (Northampton)
Hi Pam this is a gorgeous Christmas card. I think I have all those dies I will give this a try. Have a great week. Hugs Jackie
Hi Pam, this is a fabulous Christmas card must have a go at this one.
xxNancyd
Pam, this is a marvellous Christmas card, thank you so much for sharing.
Have a great time on the cruiser.
Rose
Absolutely stunning techniques, use of color and lovey cuts.
Post a Comment