About Me

My photo
Hi, I'm Pam and thank you for visiting my blog. I have been making cards for over 10 years and am an independent demonstrator for Creative Expressions. I am lucky enough to teach on cruise ships and also get the chance to demo at The Big Stamping and Scrapbooking Show at Alexander Palace. I run workshops for a local craft shop and if anyone would like details of the them please e-mail me at stephen.smith870@ntlworld.com I love to scrapbook but my all time favourite thing is to get messy with ink!
Showing posts with label Eco green paint. Show all posts

Tuesday, 28 January 2014

Circular Wall Plaque

Tuesday again and I'm back with a "wall art" project for my Creative Expressions Design Team Project.

Start by painting one of the Studio 490 Art Part Circles and frame with White Eco Green Acrylic Paint.
Cover the circular frame with Cosmic Shimmer Clear Texture Paste.  Apply it unevenly leaving a very bumpy surface.  Leave to dry.

When thoroughly dry, cover with Broken China Distress Paint.

Stamp 3 of the Antique Dress Forms onto the white circle with Perfect Medium and heat emboss with Cosmic Shimmer Bright Gold Metallic Powder.

Attach a piece of white Seam Binding to the circle with Cosmic Shimmer Dries Clear Glue to use as a hanger.

Stamp the 6 petal flower from the Button Floral Stamp Set onto some patterned paper (mine was Tim Holtz) using Perfect Medium and heat emboss with the Gold powder as before.  Stamp 15 of them to make up 5 of the 3d roses.

Stamp the leaves from the Studio 490 "Love to make Art" set onto Coconut White card using Perfect Medium Ink.  Heat emboss with the same Gold Powder and cut out.


Apply Cosmic Shimmer Gilding Wax Metallic Enchanted Gold to the frame.  Glue the frame into place with Dries Clear Glue.
Glue the leaves and flowers onto the frame.

 
And that's the wall hanging complete!

Well, that's it for today.  I'll be back next Tuesday with another Creative Expressions project.  Hope you like this one and many thanks for visiting.  Have a great week!


Tuesday, 26 November 2013

Crackle Paint Technique

Good Morning All.  It's Tuesday, so that means it's my day for the Creative Expressions Design Team project.

So without further ado, here goes.

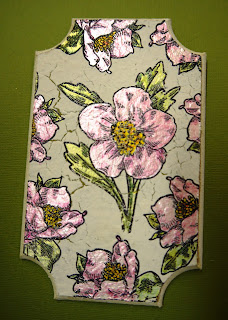
Paint one of the small MDF plaques with Eco Green Moss Acrylic Paint.  Leave to just about dry.  Paint over the top with a layer of PVA glue.  Dry lightly (it should still be tacky) and paint a layer of Eco Green White Acrylic Paint over the top.  Dry thoroughly with a heat gun until the crackles appear.


Stamp the Christmas Rose with Black Archival Ink and heat emboss with Cosmic Shimmer Clear Embossing Powder.


Paint the leaves with Cosmic Shimmer Watercolours Set 6 (Luscious Greens).  I've used Antique Green and Golden Mint.
Paint the flowers with Cosmic Shimmer Watercolours Set 3 (Brights).  I've used Candy Floss and Rose Hue.  The flower centres have been painted with Yellow Sun and Scarlett Sunset.


Paint around the edges and the back of the frame with Eco Green Black Acrylic Paint.
Paint a Scalloped Studio 490 Art Part Border with White Acrylic Paint and the edges with Black Paint.
Stamp the sentiment with Black Archival Ink and heat emboss with Cosmic Shimmer Clear Powder.
Glue the border into position and it's finished!


I hope you've enjoyed today's project.  Many thanks for visiting and don't forget, for more ideas using this fab stamp set, visit the Creative Expressions Blog (link on the right) and see what the rest of the Design Team have been up to.

Until next time....

Tuesday, 25 June 2013

Craft Stamper, New Stamps and Sunday Stamper

I've got a lovely new set of stamps to play with sent to me by the very generous Sam Poole!  Then I thought, what could be better than to play with them and make another entry for the Craft Stamper competition!  Then I thought, I could also make this for the Sunday Stamper on Hels blog!!

I do love the layered triple embossing technique so it was all the excuse I needed!

I thought I'd make a card using it this time and here's the finished project.

I've done a step by step so here goes....

I started by covering a piece of white card with Perfect Medium and built up layers of UTEE.  I've used Silver, Gold and Bronze as a base.  Next I pushed a scouring pad into the Perfect Medium and dabbed it onto the card and applied some Vintage Golden White Cosmic Shimmer Embossing Powder.  While it was still hot, I used a teaspoon to sprinkle a little black powder on. 
I've also used a mask to apply some Lava Red powder.

The next step was to stamp the Art Collage A6 stamp over the top with Royal Purple StazOn.  I've stamped randomly and gone off the edge.  After that, I've edged it with Eco Green Black Acrylic Paint.

I used the Creative Expressions Lattice Embossing Folder for the black card and applied Vintage Plum Gilding Wax around the edges.  Once the Gilding Wax is dry, give it a polish and stick the main panel onto the black card then onto the DL card.

I stamped a tag with the Art Collage stamp using Seedless Preserves Distress Ink and heat embossed it with clear powder then ran it through the Lattice Embossing Folder before distressing the edges with the same ink.

The next stage is to colour a piece of card for the flowers.  For this, I "smooshed" the same Distress Ink onto my craft sheet and spritzed it with water.  Dab the card (I've used Coconut White) into the ink and dry.  Then dab and dry again and finally spritz with water and dab with some kitchen towel to remove some ink.  Dry then stamp the flowers.  The stamp set I've used is Steampunk Flowers and I've stamped them with black Archival Ink.

Cut the flowers out and dip one of the smaller ones into clear UTEE in a Melt Pot (or Perfect Medium and embossing powder if you don't have a Melt Pot).
To finish, glue the flowers on and add some gems and a Dazzler.

I had a lot of fun making this and really hope you like it!
The stamps I used are by Sam Poole at Creative Studios (the link is on the right).

No travel photo today as there are so many photo's for the step by step but I'll be back tomorrow for WOYWW as well as on the Creative Studios Design Team blog with a new project.  Hope to see you there!!

Many thanks for visiting and leaving your comments.

Thursday, 20 June 2013

Craft Stamper

Good Morning Bloggers.  Well this is a surprise, me blogging 2 days in a row!

There is a reason for it and the clue is in the blog title!

I was merrily flicking through my new Craft Stamper magazine when I saw a layered embossing technique.  It looked so cool that I had to give it a try.  Then I saw that Craft Stamper have a competition running to enter your efforts using this technique so here's mine!

I started by covering a wall hanging with Eco Green White Acrylic Paint and made sure it was dry before coating the whole piece with Perfect Medium. 
I've put various colours of Cosmic Shimmer Ultra Thick Embossing Powder on it in gradients allowing some of the colours to blend where they meet.
The colours I used were Lapis Sapphire, Blue Raspberry, Midnight Blue, Arctic Lake and Tropic Pearl.  After heating embossing the whole piece, I've smeared some more Perfect Medium onto it and added more colour.

The next stage was to ink through a mask with Perfect Medium again and heat emboss using Cosmic Shimmer True White Powder.  I've stamped a few images with Black Archival Ink in the background from the Dandelion Wished stamp set from Creative Expressions.

The next step was to stamp some sentiments from Art Sayings and a large dot background stamp onto single ply tissue using Black Archival Ink.  I applied the tissue to the wall hanging using Beeswax that I had melted in my Melt Pot.  The stamps used are by Sam Poole at Creative Studios.
I edged the whole think with Eco Green Black Acrylic Paint applied using a piece of Cut 'n Dry Foam.


I die cut some of the Spellbinder D Lite dies in black card and stuck them on with Cosmic Shimmer Dries Clear Glue.

The final steps were to make up some 3d roses and some flowers using the Spellbinder Carnation Creations Dies, stamp some leaves from the Wise Friend stamps and dip all of them into clear UTEE (again using the Melt Pot).


To finish, I added a metal embellishment made up from small bits and pieces I had in my stash and Creative Expressions ribbons tied around the string hanger.
I do hope you like it, the photo isn't the best as it really doesn't show the shine of the layered embossing.

That's all for today as it was a marathon step by step!
Until next time, have a happy, crafty day!

Wednesday, 8 May 2013

WOYWW

 Morning All!  I'm back after the cruise and got home to find a package of loveliness to play with.
An enormous thank you to Sam Poole (who is extremely talented) for sending me these fab goodies to play with.  Anywho, this is what's on my desk today. 

So what did I do with it all....well, I managed to make 1 wall hanging as I had 3 weeks worth of washing to catch up with.  I had to have a little play, couldn't resist!  Here's the finished project.
The first thing I did was to cover the background with some K&Co paper which I distressed with Peeled Paint.  The arch frame was painted with Mulch Eco-Green Acrylic Paint.  I picked up some Olive paint on a piece of Cut 'n Dry and dabbed it on.  When it was dry I stamped the Woodgrain background stamp onto it with Coffee Archival Ink.
I've also stamped some of the leaves onto the background and painted them with the Peeled Paint Distress Ink.
The next step was marking where the arch would go so that I could stamp the message in the right place.
I stamped the owl onto a piece of patterned paper (K&Co again) with Archival ink, then overpainted it with Distress Inks.  I stamped it again onto Coconut White card, painted it and cut some of it out to decoupage with.
The leaves were also stamped onto white card, cut out and painted.
The colours of Distress Inks used were: Peeled Paint, Spiced Marmalade, Mustard Seed, Vintage Photo and Rusty Hinge.

It was great fun to make and now that the washing and drying are finished...yippee!!!...I can get down to some serious playing.  I hope to have lots more finished pieces to show you over the next few days.  All of the items used are available from Creative Studios...check online and visit Sam's blog as well as the other design team members.

Just to finish off with, another picture of the sail in to Venice .  It has to be one of the most spectacular sail ins in the world as you have to sail past St. Mark's Square to get to the cruise ship berths.  I have to say that I was pretty pleased with my photographic efforts as well!!!

Many thanks for visiting and I hope to get around as many desks as possible this week.  I do appreciate all of the comments that you leave.  Until next time....happy crafting.

Friday, 12 April 2013

PVA Crackle

Today's offering is a card we'll be making at the May 18th workshop at Martells in Cliftonville.
I used a size 8 tag and painted it with blue Eco Green acrylic paint then applied a layer of PVA glue.  Dried it a little then painted over it with white acrylic.  Next, heat up wuth your heat gun and crackles will appear.  I very gently applied Black Soot Distress Ink around the edges.
The stamps are from Creative Expressions.
The background was made using Faded Jeans Distress Ink and a wet smooshing technique.  I roughed up the edges with a pair of scissors then distressed with Black Soot again.
This is only a very quick post as we're off to Ally Pally at 7am and we still need to load the car up and I need more tea!!
Hope to see you there and thanks for stopping by. 

Wednesday, 3 April 2013

WOYWW


Good morning and Happy WOYWW.
I thought I'd take a piccie of my "heat it" station!
This is where the iron, heat gun and Melt Pot live (along with essentials like the kettle!)
My Melt Pot had gathered dust on a shelf until I saw Hels on C&C and I just had to get it back out and play.  I should have been prepping for todays demo but this was much more fun!  Anyway, here is the result.
I had a really cheap canvas that needed cheering up so covered it with Vintage Shabby Tim Holtz paper.
I melted Beeswax on a low setting in the Melt Pot, stamped some images onto a single layer of tissue and applied them to the canvas using the wax.  The stamps are also by Sir Tim.
I covered a small square of Studio 490 Art Parts with the same paper, stamped a message and 2nd generation pattern then painted the wax over the top.
The flowers and leaves were made from Spellbinder dies as where the flourishes.
I used Hels tip of scrunching up the leaves before coating them in wax.  The sides of the canvas and the Art Part were painted with Eco Green Black Acrylic Paint.  It's a great range of paints and I love them because they dry really quickly.  Everything I used is available from Creative Expressions. So, once again, many thanks to Hels for getting my Melt Pot mojo working again!  I'm also entering this as my Sunday Stamper entry...it's nature themed this week.  Pop over to Hels blog for details.
I've got some candy up for grabs...please see previous post for details.  It's a fab set of stamps and masks.
Off to pack up the car with all the demo stuff...really looking forward to it and I'm taking the canvas with me to sit in pride of place!
I'll try and get around to as many of you as I can but thank you for visiting and all your lovely comments...I was blown away last week.