Good Morning All and a very Happy Thursday!
I'm so sorry, but this will be my last posting for the design team. I will still post the odd project for you so please check in from time to time.
I've really enjoyed the time I've been on the team but we are getting too many working cruises to be able to post regularly and I felt I wasn't able to give the time to bring you fresh projects that these fabulous products deserve. I'll still be teaching at Martells, having crafty Sundays and working at Ally Pally...all using Creative Expressions products. I hope to see some of you in April...if not before.
Anyway, let's go out with a good one.....
Emboss a rectangle of Coconut White Card using the A4 Leafy Quad Folder.
Matt and layer onto Black Foundations Card.
Die cut 4 Orange Blossom Leaves from Foundations Black Card and glue into position.
Die cut the plain black background using Frames and Tags - Tessa
and the detailed overlay from the same die set using Coconut White card. Glue together.
Stamp the sentiment from the Elements Stamps - Flowers onto white card with Black Archival and heat emboss with Cosmic Shimmer Clear Powder. Glue onto the die cut background.
Attach the whole thing to the card with 3d pads.
Ink up the Shaded Peony stamps with Perfect Medium and stamp onto Black card. Heat emboss with Cosmic Shimmer True White Powder. Cut out and glue into position
Add small black Dazzlers to the flower centres to finish
And there it is! I hope you like it.
I will miss bringing you a project every week...it's certainly made me think!
But on the plus side, we're having a lot of adventures on the cruise ships including flying to Tahiti on Sunday and sailing to Australia. In April we fly to Mexico and spend 4 weeks cruising around the Caribbean...in fact, we leave the day after Ally Pally! So, you can see why being on the team was just getting too difficult.
As I said before, I will pop on here from time to time with a project and of course, the rest of the team will still be coming up with fab ideas for you.
Until next time......
Good Morning All and a very Happy Thursday!
This week I have another set of the Festive Collection Dies by Sue Wilson to show you. I'll be using the Snowflake Dies for this card and I have to say how impressed I was with how easy they cut as they're quite detailed.
Anyway, let's get started.....
Ink up the A6 Holly Script Background stamp (Creative Expressions) with Perfect Medium and stamp onto Coconut White Card to cover the whole background. Heat emboss with Cosmic Shimmer Bright Metallic Gold Powder.
Matt and layer onto Vintage Gold Card.
Die cut the Spellbinders Classic Oval Large from the same gold card.
Ink up the sentiment with Perfect Medium and stamp onto Coconut White card. Heat emboss with the gold powder.
Cut out with a smaller oval die from the same set.
Glue together and add to the background with 3d foam pads.
Cut out the Festive Collection-Snowflakes using Coconut White card. Cut out the largest using the Vintage Gold Card. Add some Cosmic Shimmer Dries Clear Glue to the centres and sprinkle with Cosmic Shimmer Golden Sand Polished Silk Glitter.
When the glue has set, stick the smaller snowflakes onto the gold oval.
Cut a strip of Vintage Gold Card and wrap a length of White Seam Binding around it then glue into position on the card.
Gluethe largest 2nd largest snowflake cut from White Card onto the oild snowflake. Add another dot of glue to the centre and sprinkle glitter as before.
Glue into position on the card to finish.
And there's the finished card! I do wish that the weather had been better for taking photos...these really don't do it justice!
Everything I've used is from Creative Expressions. I hope you like it.
Well, that's it for this week. I'm starting to get excited about Ally Pally, it's only a month away and I'll be demoing there again for Sue and the Creative Expressions Team....hope to see some of you there. In between the demos I'll be working on Sue's Rubbernecker Stand. If you can think of anything you'd like to see me demo, leave a comment!
That just leaves me to say, many thanks for stopping by and until next time, have a happy, crafty week!
Good Morning All and a very Happy Thursday!
Still nice and warm for making Christmas Cards but I really enjoyed making this weeks project for Creative Expressions. When the Classic Poinsettia Dies first came out, I fell in love with them so it was a great excuse to get them back out and have a play!
Anyway, let's get on with the card.............
Emboss a square of Foundations Ruby Card with the A4 Frosty Swirls Folder.
Matt and layer onto Coconut white and Ruby before adding to the blank card.
Did cut both parts of the Italian Collection-Calabria from Coconut White Card.
Attach the outer ring to the card with 3d pads and glue the inner one into position.
Ink up the Elegant Poinsettias stamp with Perfect Medium and stamp onto Ruby Card. Heat emboss with Cosmic Shimmer True White. Cut out with the Festive Collection Classic Poinsettias Dies.
Shape the petals and glue together. Glue onto the outer circle.
Cut out some Festive Collection-Filigree Poinsettia flowers from Coconut White Card.
Die cut the Trailing Ivy from the same white card.
Glue into position on the card.
Ink up the sentiment (from the A5 Seasonal Snow set) using Black Archival Ink and stamp onto Coconut White Card. Heat emboss with Cosmic Shimmer Clear Powder.
Die cut with the Small Standard Circles. Cut a matt from the Ruby Card with the same dies. Attach to the card with 3d pads.
Just add some 8mm black pearls to the flower centres and you're finished!
Hope you like it!
Well, that's it for this week...I'll be back next Thursday with another Christmas project. I will pop on here Sunday to announce the winner of the wall hanging.
Many thanks for visiting and leaving comments. Would you like more giveaways of the samples I make, just let me know in the comments?
Until next time, have a happy, crafty week!
Good Morning All and a very Happy Thursday!
Well, here I am again, home safe and well after a fantastic festival and excited to show you another project made using the fab Floribunda Stamp. So, let's get started!
Using one of the dies from the Portuguese Collection-Lisbon set, cut 3 evenly spaced shapes from a piece of Foundations Sky Blue Card.
Glue onto the blank card.
Dry emboss a piece of Coconut White card with the A4 Leafy Montage Folder. Attach a length of pale blue ribbon before gluing onto the blue card.
Ink up the Floribunda stamp with Perfect Medium and stamp onto a piece of the Sky Blue card. Heat emboss with Cosmic Shimmer True White Powder.
Stamp "Thinking of You" from the Butterfly Dreams Stamp set on the same piece of card. and heat emboss as before.
Cut out with the Lisbon Dies.
Attach to the card with 3d pads.
Tie a triple bow with some of the pale blue ribbon and attach with a glue dot.
Stamp a small butterfly from the Butterfly Dreams set into the gaps using Black Archival Ink. Paint with Tumbled Glass Distress Ink.
Die cut 3 butterflies using the Spellbinders Papillon 2 set from the Sky Blue Card. Shape the wings and glue into place. Add 3mm pearls to the butterflies bodies.
And to finish, just make up a small Foldover Flower using the Finishing Touches Die and some White Felt. Glue into position and you're done!
I hope that all made sense!
Don't forget, if you'd like to go into a draw for the wall hanging I made last week, just leave a comment on here. I'll draw a name on July 12th.
As always, everything used on this card is from Creative Expressions. Next Thursday I'll be showing you a Christmas make! I know, it's months away....surprising how quickly it comes around when you've got a lot of cards to make though!
Anyway, that's it for today. Many thanks for stopping by and leaving comments. Until next time, have a happy, crafty week!
Good Morning All and a very Happy Thursday!!!
Hope I didn't catch too many of you out with the change of day!
Anyway, a new month which means new goodies from Creative Expressions to play with!
The stamp used in this card is called "Floribunda" and it matches the Sue Wilson Portuguese Collection - Lisbon Die Set.
So let's get started.....
Ink up the stamp with Perfect Medium and stamp onto Coconut White Card. Heat emboss using Cosmic Shimmer Bright Gold Metallic Powder.
Cut out using the largest of the Lisbon Dies.
Emboss a piece of Coconut White Card with the A4 Rambling Blossoms Folder.
Matt and layer onto Foundations Vintage Gold Card.
Attach to the blank C5 card.
Cut out the 2nd smallest complete die using the gold card.
Cut out again with the inner pattern in place, this time using Coconut White card.
Stamp the sentiment from the Flower Hearts Elements Stamp Set by John Lockwood using Perfect Medium onto the white card.
Heat emboss with the gold powder as before.
Glue the gold and white die cut shapes together.
Cut a strip of Creative Expressions Gold Tulle and tie a knot in the centre. Attach to the card with a dry glue dot then trim to the right length.
Add the floral stamp with 3d pads.
Add the sentiment with a double layer of 3d pads.
Cut out 2 of the Trailing Ivy Finishing Touches Dies from Coconut White Card.
Shape the leaves and attach to the card with glue and 3d pads.
And there's the finished card! It would make a lovely card for a Golden Wedding Anniversary. With a change of sentiment it could be used for so many occasions, my favourite sort of design!!
I hope you like it!
As always, everything used on here is from Creative Expressions.
Just leaves me to say, many thanks for stopping by and leaving comments, they are much appreciated.
I'll be back next Thursday with another design using the same die set....let's see how many ways I can think of using it!
Until next time, have a happy, crafty week!
Good Morning All and a very Happy Tuesday!
I hope everyone had a great time at Ally Pally, I know I did (and spent far too much....again!). Lovely to meet up with some of you there.
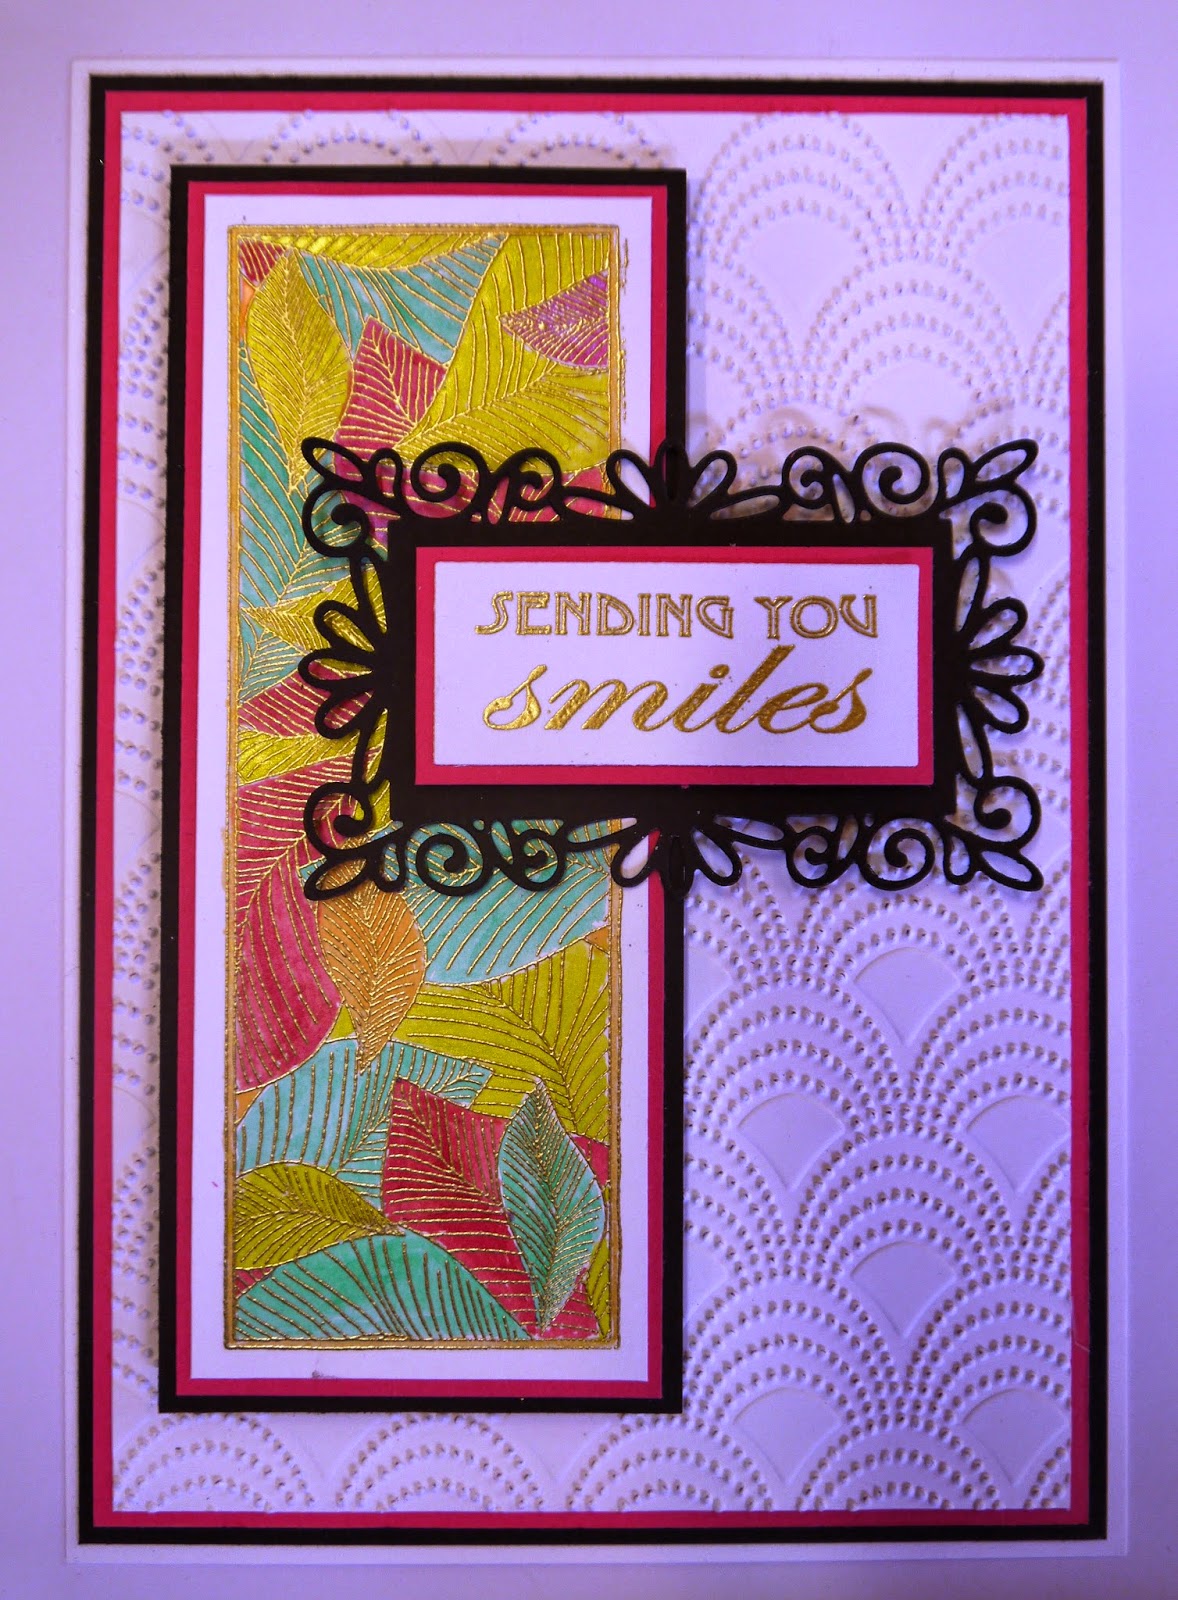
Anyway, it's Tuesday again which means that it's time for a new project.
I've gone very bright this time....must be the effects of the sunshine we've had!
For this card I've used the Skelton Leaves Striplet Stamp and the sentiment is from the Elements-Butterfly Dreams stamp set.
Ink up the striplet stamp with Perfect Medium and stamp into Coconut White Card. Heat emboss with Cosmic Shimmer Bright Gold Metallic Powder.
Paint with Cosmic Shimmer Drawing Inks. I've used Forest Green, Rich Gold, Cherry Glow, Golden Glow and Lime Burst.
Emboss a piece of Coconut White card using the A4 Beaded Fanfare Folder.
Matt and layer the painted panel and the embossed piece of card with Raspberry and Black Foundations Card.
Attach the panel to the card with 3d foam pads.
Ink up the sentiment with Perfect Medium and heat emboss with the gold powder.
Die cut with the Dainty Rectangular Frames. The pink layer has been cut by hand.
Use glue and foam pads to attach to the card.
Die cut 3 butterflies from the Spellbinders Wonderful Wings set using the Raspberry Card.
Shape the butterflies and attach using glue just on the body section.
And that's the finished card!
Everything I've used is from Creative Expressions.
The colours remind me of the Caribbean and I think that if you're sending Smiles, the card should be bright and zingy!
The tip I would give you is, if you're using anything to paint with that has Mica on the, heat emboss the image before painting. The mica will cover the stamped lines otherwise and make them look muddy.
Well, that's all for this week. Many thanks for stopping by and leaving comments. I'll be back next Tuesday with another card using the Elements-Flower Frame Stamp Set.
Until then, have a happy, crafty week!
Good Morning All and a very Happy Tuesday!
I've made a wall hanging for today's DT piece with a sentiment that I agree with totally! I'm planning on hanging it in my kitchen where I shall do my best to follow the advice!
Anyway, let's get started....
Paint a small wooden plaque with Cosmic Shimmer Midnight Matt Chalk Paint.
Ink up the "Life is Short" Singles stamp with Perfect Medium. Stamp onto the plaque and heat emboss with Cosmic Shimmer Bright Gold Metallic Powder.
Apply Perfect Medium Ink around the edges using a piece of Cut 'n Dry Foam. Heat emboss with the same powder as before.
Ink up the Cake and Spoon stamps from the A5 Vintage Cooking set with Perfect Medium and stamp several times onto Black Foundations Card. Heat emboss with the Bright Gold Powder and cut out.
Attach to the wall hanging with 3d foam pads.
Add some Golden Light Metallic Gilding Wax to the outer edge of the plaque.
Ink up the sentiment from the A5 Vintage Cooking Set with Perfect Medium and stamp onto Black Foundations Card.
Cut to size and glue onto a piece of Grungeboard.
Apply Perfect Medium Ink around the edges as before and heat emboss with Bright Gold Powder.
Attach to the plaque with Black Seam Binding.
Make a loop of Black Seam Binding and attach to the top of the plaque with Cosmic Shimmer Dries Clear Glue as a hanger.
And that's the finished project! Hope you like it.
I'm going to be having a couple of weeks off blogging over Christmas but I'll be back in the New Year with new stamps and ideas. Please pop back on January 6th to see what I've made!
In the meantime, have a Very Happy Christmas and a fab New Year. see you all soon..................
Good Morning All and a Very Happy Tuesday.
I hope that those who could make it enjoyed Ally Pally, it's always such a great show.
Today I'm going to do a step by step on one of the cards that I demoed at the show.
I've used the Filigree Poinsettia Stamps and the Festive Collection Classic Poinsettia Dies.
Start by inking up one of the Poinsettia stamps with Perfect Medium. Stamp randomly onto a piece of Coconut White Card and heat emboss with Cosmic Shimmer Bright Gold Powder.
Matt and layer onto Vintage Gold Foundations Card.
Ink up the largest Poinsettia stamp with Perfect Medium and stamp onto a piece of Vintage Gold Card. Heat emboss with the Bright Gold Powder.
Cover 2 of the stamped images with Double Sided Adhesive and apply Cosmic Shimmer Diamond Sprinkles. Die cut with the Classic Poinsettia Dies. Die Cut the 3rd Poinsettia.
Do the same with the smaller Poinsettia stamp, but this time onto Coconut White Card.
Only apply the Diamond Sprinkles to one of the flowers before Die Cutting.
Shape the petals and glue together.
Stamp the sentiment onto white card and heat emboss as before (this sentiment is from the A5 Filigree stamp set).
Cover with Double Sided Adhesive, then add the Diamond Sprinkles before die cutting with the Californian Collection Basic Frames Set A.
Die cut a matt from the Vintage Gold Card using the Californian Collection Decorative Frames Set B.
Cut 3 strips of Double Sided Adhesive of different lengths 1 inch wide, cut into pennant shapes and stick onto the background. Apply the Diamond Sprinkles.
Glue the Poinsettias into position. Add the sentiment with 3d foam pads.
Glue the Finishing Touches Small Circle Dazzlers to the centres of the Poinsettias to finish.
And there's the finished card!
The Filigree Poinsettia Stamps are terrific to work with, they give a wonderful stamped image and are so detailed.
I hope you've enjoyed the tutorial! Next week I'll be back with another card from the demo's and lots more Xmas inspiration...I do hope you'll visit.
In the meantime, many thanks for stopping by and leaving comments. Have a happy, crafty week!
Good Morning All, back again with another project for Creative Expressions to share with you. The "Golden Wonder" doesn't refer to crisps, but rather to the fact that I got carried away with the Cosmic Shimmer Bright Gold Embossing Powder!
Anyway, here's the step by step.
Ink up the Ivy Corner Singles Stamp with Perfect Medium and stamp onto Foundations Mocha Cardstock in 2 corners. Heat emboss with Bright Gold Powder.
Use a pair of scissors to distress the edges.
Dry emboss with the A4 Sea Garden Embossing Folder.
Go over raised areas and the edges with Vintage Golden Green Gilding Wax.
Cut a piece of Dark Roast Coffee Foundations Card to size, distress with scissors then matt and layer. Glue onto a card blank made with Foundations Milk Card.
Cut 2 Spellbinder Scalloped Circles Large, 1 from Milk card and the other from the Dark Roast Coffee.
Cut a Spellbinder Standard Circle Small from the Mocha Card.
Ink up the Botanical Spray Singles Stamp with Perfect Medium and stamp over the Standard Circle. Heat emboss with Bright Gold Powder.
Rub some of the Gilding Wax around the edges of the Scalloped Circles them matt and layer.
Stamp a sheet of Milk Card with the Botanical Spray and heat emboss as before.
Cut flowers out using Spellbinder Spiral Blossom 3 and make up into 3d flowers. Add Gilding Wax to the tips of the flowers.
Die cut leaves from the Foliage Spellbinders set from the same piece of card. With the die still in place, add some Gilding Wax.
Arrange onto the card and glue into place.
And there's the finished project!
It's really rich and textured and would make a great Golden Wedding Anniversary Card. I hope you like it.
I had a great time at Ally Pally and hope you enjoyed all my demo's....I seem to have become a fixture in the demo area!
Many thanks to everyone who came to the workshop on April 5th, a good time was had by all! Looking forward to seeing the next class later this month. The workshop has now sold out but I have classes planned for June. The shop has the details of the dates and what we'll be doing so please give them a ring if you're interested.
Well, that's all for today, back again tomorrow with a project for Creative Studios. Many thanks for visiting and leaving comments.
I've been lucky enough to be sent 2 of the new Singles range of stamps to play with this month as well as some of the new Cosmic Shimmer Misters.....I do love being on the Design Team for Creative Expressions!
This week I thought I'd combine the 2 stamps for this card. So without further ado, let's begin!
Ink up the Ivy Corner stamp with Perfect Medium and stamp onto Coconut White Card. Heat emboss with Clear Powder.
Spritz the Cosmic Shimmer Aqua Breeze Ink Spray Mist all over. Dry then use a wet wipe to smear the ink around (as well as lifting it from the embossed image).
Spritz the mister onto a craft sheet and ink up the same stamp with it. Stamp onto the card and blot to dry.
Spray some water onto your hand and flick water droplets onto the card. Blot again to dry.
Distress the edges of the card with scissors then go around the edges with Seedless Preserve Distress Ink.
Dry emboss with the A4 Sea Garden Embossing Folder. Highlight the raised areas with Seedless Preserve Ink.
Ink up the Botanical Spray stamp with Perfect Medium and stamp onto Coconut White card 3 times. Heat emboss with Cosmic Shimmer Clear Powder. Spray some Aqua Breeze Mister onto a craft sheet and pick up the ink with Cut 'n Dry foam. Dab over the stamped image.
Emboss again with the Sea Garden A4 Folder. Distress with Seedless Preserve Ink.
Die cut using Spellbinder Labels H in 3 different sizes to create a Pyrimage effect. Draw around the largest of the dies used on black card and cut out to create a matt. Matching the patterns up, put together with 3d pads.
There will be 2 leftover frames, glue these onto the card for added interest and texture.
Glue the 3d element onto the card.
Die cut 3 Butterflies using Spellbinder Les Papillons 2 from Coconut White card, shape and glue into place. Add a 3mm black pearl to the bodies of the butterflies.
And we're finished!
Well, this is my last posting before Ally Pally. I do hope that I'll see some of you there. Please pop over and say hello. I've also just received my copy of the Creative Expressions Project Book 3 and I've got to say, it is an enormous thrill to see one of my projects in it!
So until next time, have a great week and keep crafting!
Well, another week has whizzed by and suddenly it's Tuesday again! So here I am, back with another project for the Creative Expressions Design Team.
This time I've used the "Get Well Soon" stamp from the Singles range and flowers from the Steampunk Flowers A5 stamp set. So let's begin!
Randomly stamp one of the flowers from the Steampunk Flowers set onto Coconut White card using Perfect Medium Ink. Heat emboss with Cosmic Shimmer True White Powder. Using Cut 'n Dry foam, apply Tumbled Glass Distress Ink around the area of the flowers. The embossed images will resist the ink. Wipe off any excess ink with a piece of kitchen towel.
Ink up the Get Well Soon stamp with Tumbled Glass Distress Ink and stamp onto Coconut White card. Heat emboss with Cosmic Shimmer Clear Powder. Using the same ink, paint some of the stamped image and distress around the edges. Cut out and matt and layer onto black card. The do the same with Coconut White card.
Attach to the background with 3d foam pads.
Stamp some of the Steampunk Flowers onto Coconut White card with Tumbled Glass Distress Ink and heat emboss with Clear powder. Cut out the flowers and remove petals from a few of them. Distress around the edges with the same ink. Glue the flower together.
Cut 6 lengths of White Seam Binding and glue together to form a cross. Using the Spellbinder Foliage Set, die cut 2 stems of leaves. With the die still in place, distress with the Tumbled Glass Ink.
Glue all of the elements into place with Cosmic Shimmer Dries Clear Glue. Add an 8mm White self adhesive Pearl to the centre of the flower to finish.
And that's the finished card!
I hope you agree that it would cheer up someone who is feeling under the weather!
Ally Pally is only a few weeks away so I hope you've got your tickets! I'm really looking forward to the show and love doing the demo's, I hope to see some of you there.
Just a couple of spaces left for the workshops in April. If you're interested, please phone the shop.
There are lots of Creative Expressions shows coming up over the next few days on Create and Craft. The lovely Julia Watts is on tomorrow. Sam Poole has shows on Sunday 30th for the Tool Shed (Sam's lovely as well!) I've been busy making samples for the shows so maybe you'll get to see some of them.
Talking of Sam, if you head over to the Creative Studios site,
Sam is looking for a new DT member...it could be you!
Well, that's all for today, back tomorrow with a Creative Studios project... see you then!