About Me

My photo
Hi, I'm Pam and thank you for visiting my blog. I have been making cards for over 10 years and am an independent demonstrator for Creative Expressions. I am lucky enough to teach on cruise ships and also get the chance to demo at The Big Stamping and Scrapbooking Show at Alexander Palace. I run workshops for a local craft shop and if anyone would like details of the them please e-mail me at stephen.smith870@ntlworld.com I love to scrapbook but my all time favourite thing is to get messy with ink!
Showing posts with label Ally Pally. Show all posts

Thursday, 24 September 2015

A Change of Colour!

Good Morning All and a very Happy Thursday!

It was so lovely to meet some of you at the weekend....thank you for stopping by and saying hello.  We had a great time but it took all of Monday to recover!!

This week is the final time using the Butterfly Dream stamps and I've gone for a total change of colour.  I rarely use yellow but the Foundations Custard card is so pretty that it's tempted me away from blues and purples.  


Anyway, let's get started.....

Cut out 2 different sized squares of Foundations Custard Card using the Sue Wilson Noble-Double Pierced Square Dies.
Cut 2 squares of coordinating paper from Phill Martin's Sentimentally Yours Graceful Butterflies and Dragonflies Paper Pad.
Matt and layer the largest card and paper squares and attach to the blank card.


The Noble Dies take all of the hard work out of achieving that gorgeous pin pricking detail.


Ink up the largest Butterfly Dreams stamp with Black Archival and stamp onto the small square of paper.
Matt and layer onto the small square of card.
Attach a length of black seam binding.
Place on the main card with 3d foam pads.

Cover a piece of the Custard Card with Double Sided Adhesive.
Die cut some Butterflies from the Finishing Touches-Magical Butterflies Die Set.
Remove the backing paper and cover with Cosmic Shimmer Diamond Snow Jewels.
Stamp the sentiment onto Custard Card and heat emboss with Cosmic Shimmer Clear Powder.
Place some double sided adhesive over the top and cut to size.
Add more of the Diamond Snow over the top.
Attach to the card with 3d pads.
Tie 3 lengths of seam binding onto the piece that is already in place.
Glue the butterflies into position.

 And there's the finished card!

Everything I've used is from Creative Expressions.  I do wish that the sparkle showed up more in the photo...you'll all have to pop round to my house to see the real thing!

Well, that's it for this week.  Many thanks for stopping by and leaving comments....much appreciated as always.
Until next time, have a happy, crafty week!


Thursday, 20 August 2015

Holly and Snowflakes!

Good Morning All and a very Happy Thursday!

This week I have another set of the Festive Collection Dies by Sue Wilson to show you.  I'll be using the Snowflake Dies for this card and I have to say how impressed I was with how easy they cut as they're quite detailed.

Anyway, let's get started.....

Ink up the A6 Holly Script Background stamp (Creative Expressions) with Perfect Medium and stamp onto Coconut White Card to cover the whole background.  Heat emboss with Cosmic Shimmer Bright Metallic Gold Powder.
Matt and layer onto Vintage Gold Card.

Die cut the Spellbinders Classic Oval Large from the same gold card.
Ink up the sentiment with Perfect Medium and stamp onto Coconut White card.  Heat emboss with the gold powder.
Cut out with a smaller oval die from the same set.
Glue together and add to the background with 3d foam pads.

Cut out the Festive Collection-Snowflakes using Coconut White card.  Cut out the largest using the Vintage Gold Card.  Add some Cosmic Shimmer Dries Clear Glue to the centres and sprinkle with Cosmic Shimmer Golden Sand Polished Silk Glitter.
When the glue has set, stick the smaller snowflakes onto the gold oval.

Cut a strip of Vintage Gold Card and wrap a length of White Seam Binding around it then glue into position on the card.
Gluethe largest 2nd largest snowflake cut from White Card onto the oild snowflake.  Add another dot of glue to the centre and sprinkle glitter as before.
Glue into position on the card to finish.

And there's the finished card!  I do wish that the weather had been better for taking photos...these really don't do it justice!

Everything I've used is from Creative Expressions.  I hope you like it.

Well, that's it for this week.  I'm starting to get excited about Ally Pally, it's only a month away and I'll be demoing there again for Sue and the Creative Expressions Team....hope to see some of you there.  In between the demos I'll be working on Sue's Rubbernecker Stand.  If you can think of anything you'd like to see me demo, leave a comment!

That just leaves me to say, many thanks for stopping by and until next time, have a happy, crafty week!

Tuesday, 14 April 2015

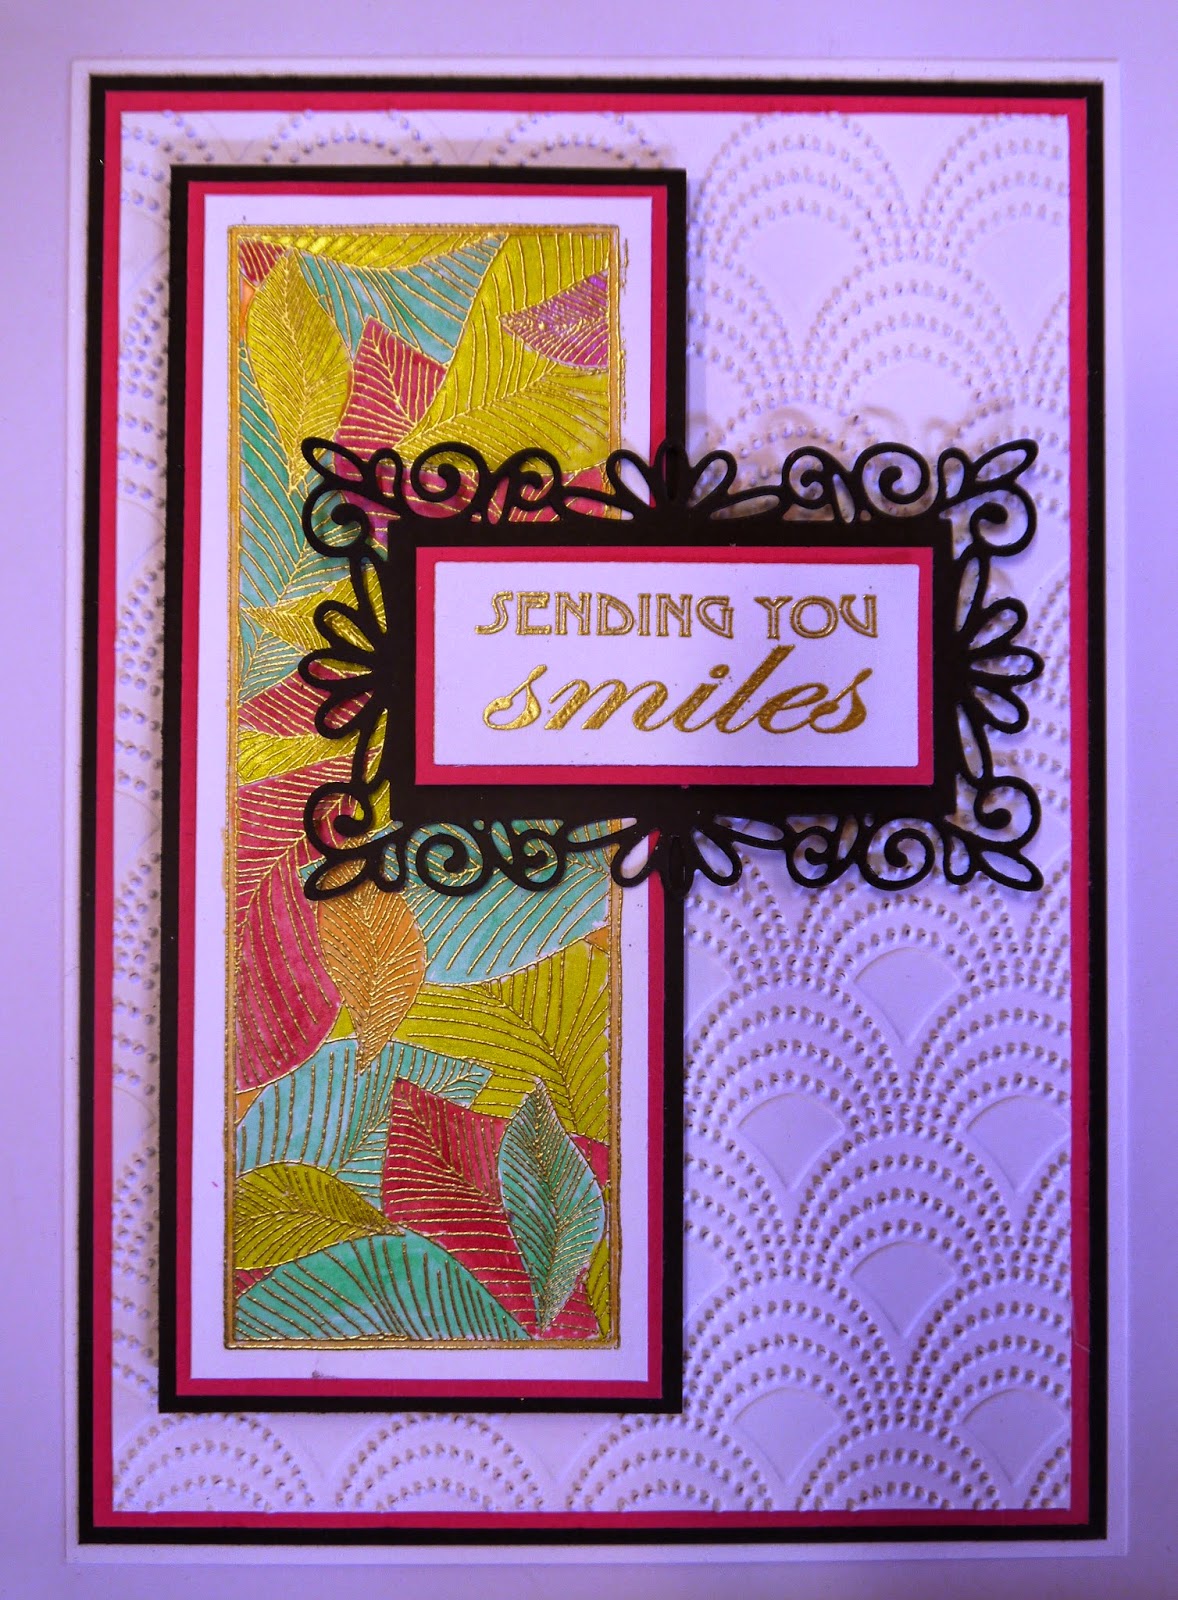
Sending You Smiles

Good Morning All and a very Happy Tuesday!

I hope everyone had a great time at Ally Pally, I know I did (and spent far too much....again!).  Lovely to meet up with some of you there.

Anyway, it's Tuesday again which means that it's time for a new project.

I've gone very bright this time....must be the effects of the sunshine we've had!

For this card I've used the Skelton Leaves Striplet Stamp and the sentiment is from the Elements-Butterfly Dreams stamp set.

Ink up the striplet stamp with Perfect Medium and stamp into Coconut White Card.  Heat emboss with Cosmic Shimmer Bright Gold Metallic Powder.
Paint with Cosmic Shimmer Drawing Inks.  I've used Forest Green, Rich Gold, Cherry Glow, Golden Glow and Lime Burst.

Emboss a piece of Coconut White card using the A4 Beaded Fanfare Folder.
Matt and layer the painted panel and the embossed piece of card with Raspberry and Black Foundations Card.

Attach the panel to the card with 3d foam pads.
Ink up the sentiment with Perfect Medium and heat emboss with the gold powder.
Die cut with the Dainty Rectangular Frames.  The pink layer has been cut by hand.
Use glue and foam pads to attach to the card.


Die cut 3 butterflies from the Spellbinders Wonderful Wings set using the Raspberry Card.
Shape the butterflies and attach using glue just on the body section.

And that's the finished card!

Everything I've used is from Creative Expressions.

The colours remind me of the Caribbean and I think that if you're sending Smiles, the card should be bright and zingy!

The tip I would give you is, if you're using anything to paint with that has Mica on the, heat emboss the image before painting.  The mica will cover the stamped lines otherwise and make them look muddy.

Well, that's all for this week.  Many thanks for stopping by and leaving comments.  I'll be back next Tuesday with another card using the Elements-Flower Frame Stamp Set.

Until then, have a happy, crafty week!

Tuesday, 7 April 2015

Let Your Dreams Fly

Good Morning All and a Very Happy Tuesday!

Only a few days to go until Ally Pally and I'm up to my ears prepping the demos!  I'll be doing 3 on Saturday and 2 on Sunday in the main demo area so I hope you'll pop in and say hi.  Other than that, I'll be on the Rubbernecker Stand with the fab Sue Wilson.  You'll even get the chance to meet Mr.S!!!

Anyway, let's get on with this weeks project.....

For this card, I've used the new Elements Stamps - Butterfly Dreams designed by Jonathon Lockwood for Creative Expressions.

Use the Spellbinder Circle Dies to cut 3 different sized holes in a piece of acetate.

Using this as a mask, stencil through with Pink Sherbet and Aqua Adirondack Inks on Cut 'n Dry Foam.
Overlap some of the circles.

Stamp the butterflies from the set onto the circles with Black Archival Ink.
Stamp the bubble stamp in between the circles.
Add a strip of Black Seam Binding  to the left hand side.

Matt and layer onto Black Foundations Card.

Stamp the sentiment onto Coconut White Card.
Paint the letters with the same inks as before.
Trim to size then stamp a couple of butterflies in the spaces and paint them.

Matt and layer onto black card.
Put onto the background with 3d foam pads.

Tie a triple bow with the seam binding and attach with a glue dot.
Add a Lilac Dazzler to finish.

And that's the completed card.....hope you like it!

Well, apart from thanking you for stopping by and leaving comments, that's all for this week.
I'll be back next Tuesday with another make using these gorgeous stamps.
Until then, have a happy, crafty week!

Tuesday, 9 September 2014

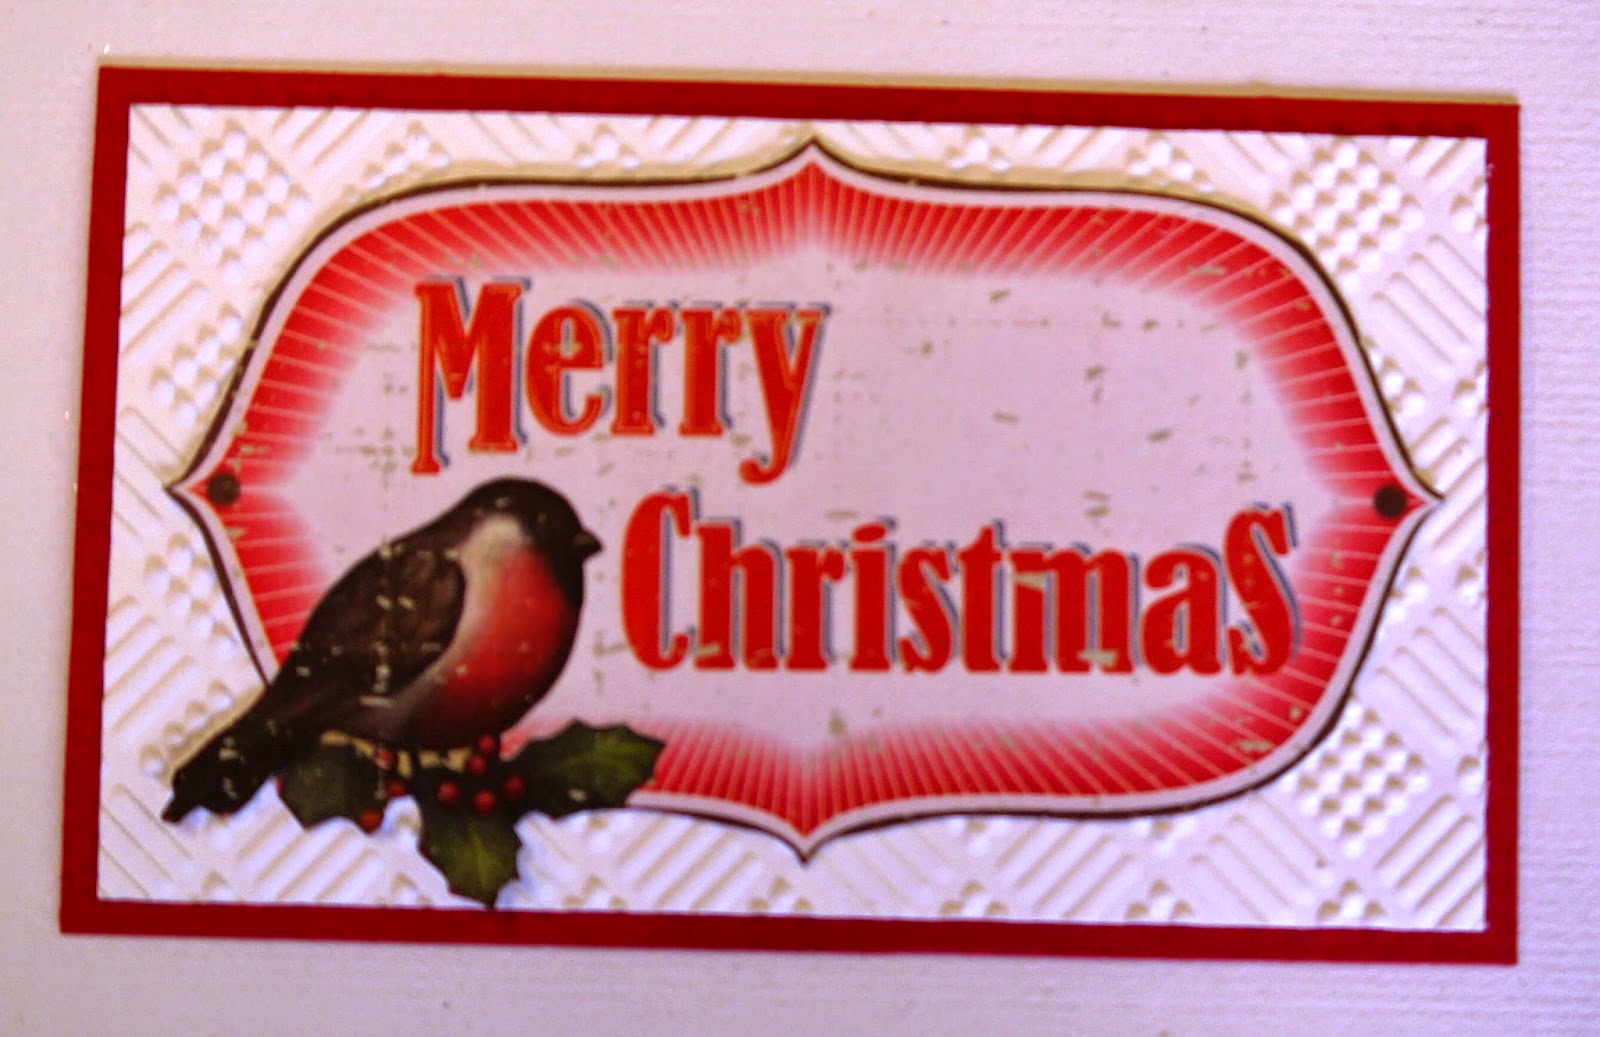
Merry Christmas!

As it's September I don't feel in the least bit guilty heading this posting "Merry Christmas".  It's definitely time to get started on those Xmas cards (although I must admit, I haven't started mine yet)!

Today, I've used some of the gorgeous new Sue Wilson Dies and also one of the new Pinpoint Embossing Folders.  The biggest surprise to those who know me is that there's NO INK!

Anyway, let's get started......

Die cut the Festive Collection Classic Poinsettias from Ruby Foundations Card.
Die cut the Festive Collection Filigree Poinsettias from Coconut White Card.
Glue the Filigree over the top of the red Poinsettias in the centre of the flowers with Cosmic Shimmer Dries Clear Glue.

Cut a piece of Coconut White card to size and dry emboss with the Pinpoint Checkboard Embossing Folder.
Matt and layer onto Ruby Card.
Attach a length of Red Crushed Ribbon to the top right corner.

Gather the centre of the ribbon and glue it down.  Tie a double bow using the same ribbon and attach with a glue dot.
Add a Small Fancy Pearl Embellishment to the centre of the bow.

Cut out one of the labels from the Couture Creations Vintage Christmas 12x12 paper pads.
Emboss a smaller piece of Coconut White Card with the same folder as before.  Glue the Robin label to the card.
Matt and layer onto Ruby Card.
 
Attach this to the main card with 3d foam pads.
 
Glue the Poinsettias into position after shaping the petals.
 
Add some 5mm and 8mm Self Adhesive Pearls to the centres of the Poinsettias and also to the Robin Label.
 
Cut the Self Adhesive Snowflake Swirl Embellishment into sections and stick some down onto the card.
 
And there's the finished card!  I hope you like it.
 
Many thanks to everyone who came to the workshop on Saturday....I hope you enjoyed it as much as I did and that you've managed to get all the ink off your hands!
 
I'm very excited as it's the Grand Northern Ukulele Festival this weekend so I'm off to practice now....in between putting some demo's together for Ally Pally the following weekend.
 
Until next time, have a very happy, crafty week and many thanks for visiting.

Wednesday, 9 April 2014

Mister Sprays and Texture Paste

Well, here we are again, back with another project featuring Sam Poole's fab Woodland Animal stamps.

This time I've also used the new Doodle Cross Mask along with the new Cosmic Shimmer Mister Sprays and Sparkle Texture Paste.

It's wonderful to have so many new products come out at the same time...lots to play with!

I did dig out a tree stamp that Sam designed a little while ago for this card....it's great to have products that you can mix and match.

I hope you like it...it would be a great card for a new baby boy (just change the colours for a girl!)

All the demo's are prepped ready for Ally Pally.  I've got Cosmic Shimmer Paint techniques and Ink Spray Mister Techniques lined up so I do hope you'll be able to join me there.

The workshops at Martells have sold out but there will be more in June.  I'll have the dates on here next week.

Until next time, thanks for visiting and leaving any comments.  Have a great week!

Tuesday, 8 April 2014

New Singles Stamps

I've been lucky enough to be sent 2 of the new Singles range of stamps to play with this month as well as some of the new Cosmic Shimmer Misters.....I do love being on the Design Team for Creative Expressions!

This week I thought I'd combine the 2 stamps for this card.  So without further ado, let's begin!

Ink up the Ivy Corner stamp with Perfect Medium and stamp onto Coconut White Card.  Heat emboss with Clear Powder.
Spritz the Cosmic Shimmer Aqua Breeze Ink Spray Mist all over.  Dry then use a wet wipe to smear the ink around (as well as lifting it from the embossed image).

Spritz the mister onto a craft sheet and ink up the same stamp with it.  Stamp onto the card and blot to dry.
Spray some water onto your hand and flick water droplets onto the card.  Blot again to dry.

Distress the edges of the card with scissors then go around the edges with Seedless Preserve Distress Ink.
Dry emboss with the A4 Sea Garden Embossing Folder.  Highlight the raised areas with Seedless Preserve Ink.

Ink up the Botanical Spray stamp with Perfect Medium and stamp onto Coconut White card 3 times.  Heat emboss with Cosmic Shimmer Clear Powder.  Spray some Aqua Breeze Mister onto a craft sheet and pick up the ink with Cut 'n Dry foam.  Dab over the stamped image.
Emboss again with the Sea Garden A4 Folder.  Distress with Seedless Preserve Ink.

Die cut using Spellbinder Labels H in 3 different sizes to create a Pyrimage effect.  Draw around the largest of the dies used on black card and cut out to create a matt.  Matching the patterns up, put together with 3d pads.

There will be 2 leftover frames, glue these onto the card for added interest and texture.

Glue the 3d element onto the card.

Die cut 3 Butterflies using Spellbinder Les Papillons 2 from Coconut White card, shape and glue into place.  Add a 3mm black pearl to the bodies of the butterflies.

And we're finished!

Well, this is my last posting before Ally Pally.  I do hope that I'll see some of you there.  Please pop over and say hello.  I've also just received my copy of the Creative Expressions Project Book 3 and I've got to say, it is an enormous thrill to see one of my projects in it!

So until next time, have a great week and keep crafting!

Wednesday, 19 March 2014

Hoppy Wednesday!

Wednesday has rolled around again at incredible speed so it's my turn to design a project for Creative Studios.

I have to say that it's been an absolute joy designing with the Woodland Animal stamps designed by Sam Poole and today's is no exception.

I thought that as the sun has been shining, I would come up with a really bright and cheerful card that would be ideal as an Easter Card.

I've used the masking technique to create the number of rabbits on here and painted them with Distress Inks.

As always, the full step by step tutorial is on the Creative Studios website so do please pop over there and have a look.

Just a reminder that Ally Pally is getting near!  I'll be on the Rubbernecker Stand with the lovely Sue Wilson as well as giving demo's in the main demo area.

There are still a couple of spaces available on the workshops at Martells in April.  Please phone the shop if you're interested.  I have to say that I'm so pleased with the ideas that I've come up with for them!!  Just a note of caution...glitter is involved so be prepared to leave looking like a disco diva!

Well, that's all for today, so until next time...keep crafting!

Tuesday, 18 March 2014

Thank You!

Good Morning All and a very Happy Tuesday!

As it's Tuesday, it's my turn to design a project for Creative Expressions and this week I've come up with a Thank You card using a fantastic new stamp on the Singles range.

So, without further ado, here's the step by step!

Place the Chicken Wire Mask over a piece of Coconut White Cardstock and spray Cosmic Shimmer Rose Pink and Pearl Misters.  Remove mask and leave to dry.
Place the mask over the card again but this time at a different angle and run through the Grand Calibur to dry emboss it.
Highlight the raised pattern with Black Soot Distress Ink.  Distress around the edges with the Black Soot Ink.

Matt and layer onto Foundations Black Cardstock.

Stamp the "Thank You" stamp with Black Archival Ink onto Coconut White Card and heat emboss with Cosmic Shimmer Clear Emboss Powder.
Spray some of the Cosmic Shimmer Misters onto a craft sheet and use as a paint to colour in areas of the stamped image (I've used the same 2 colours as before plus Meadow Lush for the leaves.)

Matt and layer onto black card.
Spray some Coconut White card with the Rose Mister and another piece with the Meadow Lush Mister.
Cut some leaves using the Spellbinder Foliage set out of the green card.
Cut a Spellbinder Spiral Blossom 2 from the Rose card and make up into a 3d flower.

Tie a triple bow with Black Seam Binding Ribbon.  Spritz with water and scrumple up before drying with a heat gun.
Attach to the card with a dry glue dot then add the foliage and flower to finish.

And there you have it!  I know that the background looked a bit of a mess in the first photo but I think it all comes together when you add the main focal point.  Anyway, I hope you like it.

That's all for today except to remind you that Ally Pally is fast approaching and I'm busy working on some Demo's for that.  I'll be back again tomorrow with a design for Creative Studios so until then, keep crafting!

Wednesday, 12 March 2014

A Hoot of a Day!

Good Morning and here I am again with another card made using Sam Poole's Creative Studios cute animal stamps.

I Love the owl, he is just the sweetest thing!  I've also used the new Birch Tree Mask.


The outer edge of the main card has been decorated with 3 different colours of Cosmic Shimmer PVA Glues.

I've done a full step by step tutorial on the Creative Studios blog so, please pop over there for a more detailed look.

I do hope you all like this one, it's been one of my favourites!

On other matters, the workshops in Cliftonville for April are almost sold out, just a couple of spaces left on each date.  If you can make it, it would be great to see you.  If not, I'll be at Ally Pally next month doing some demo's for the lovely Sue Wilson so do come over and say hello!  Failing that, I'll be in Deal on March 15th playing my ukulele with the Sunshine Ukulele Club!

Until next time, have a great week!


Wednesday, 4 December 2013

Follow Your Dreams

Good Morning All.  Hope everyone is well and Christmas isn't causing too much stress!

I've definitely moved away from the Christmas theme with the card that I've designed for the Creative Studios Design Team Blog this week.

I've used the High, Low technique that the wonderful Sue Wilson showed me at Ally Pally back in September (that seems like a lifetime ago!).

I've put the full step by step instructions on the Creative Studios Design Team Blog.  To get there, look on the left for the link to Sam Poole.  I've also used her fabulous "Up, Up and Away" A5 stamp set.

Anyway, here's the finished card.  Hope you like it.


I'm away on my travels at the moment but still blogging so please come back and see me again.  I do appreciate your visits and also the comments.

I think we'll probably be up to 300 followers by the time I get back so I'll be able to do the draw for the Blog Candy.

Until next time, stay healthy and have a happy, crafty time!

Wednesday, 18 September 2013

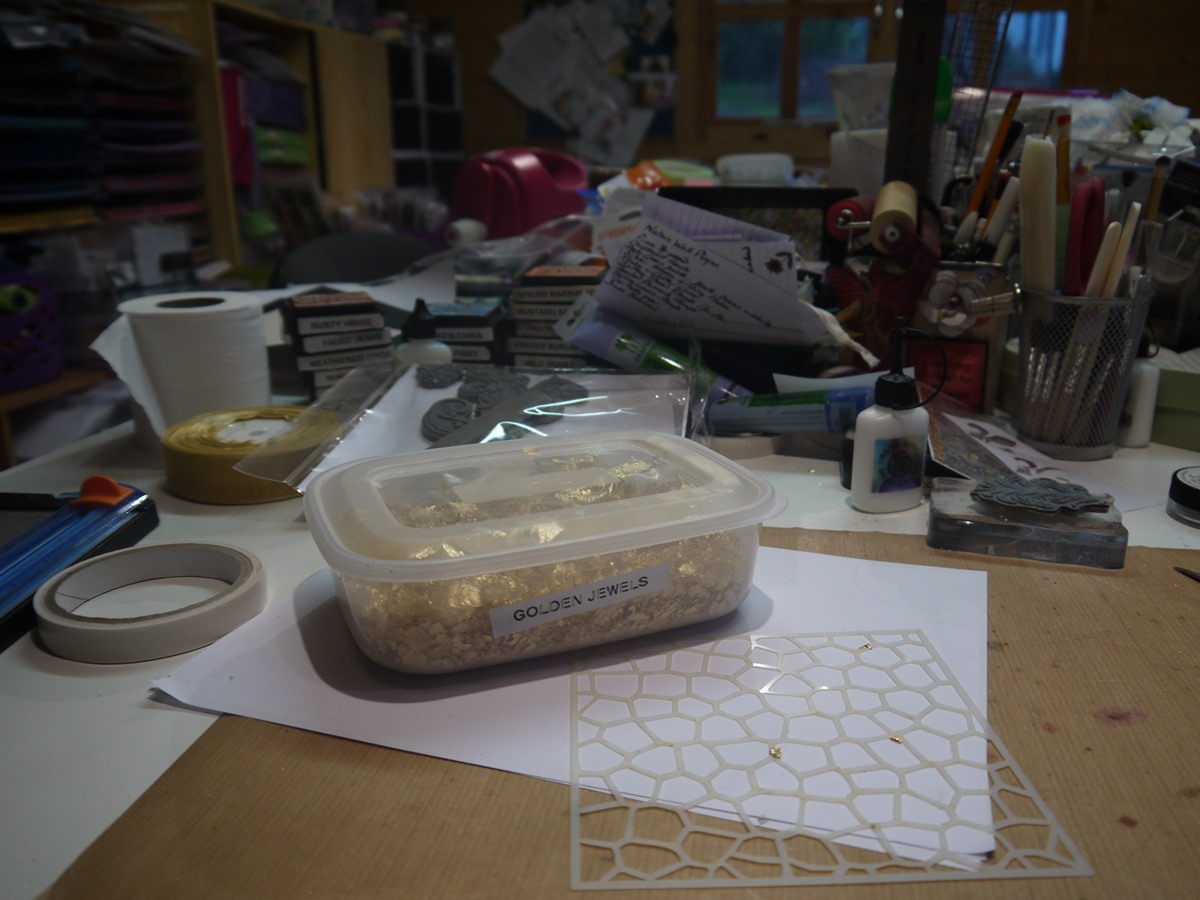
WOYWW

Good Morning All and happy WOYWW!

It's nearly that time of year again, Ally Pally is this weekend and so I'm busy prepping demo's hence the state of my desk.  It's my excuse and I'll use it if I want to!


After I took this photo I did finish the card and here it is in all it's glory.


I've used one of the new Christmas Bauble stamps from Creative Expressions with the ultra fine glitter.  It doesn't really show up very well in the photo but there's lots of bling on this one!

It's also my DT day on the Creative Studios blog and I'm in Halloween mode again.  I've used one of Sam Poole's new stamp designs and had a ball making this one.  I've put the full step by step on the design team blog.


In other news, the kitten has settled in well, he loves cuddles and playing with all the new toys he's been bought!  I still can't understand how anyone could have dumped him in a sealed cardboard box but I guess it was his lucky day.  He's at the vet's at the moment having another check-up before getting his vaccinations.  I'll miss him when my daughter moves out but I do have full kitten-sitting rights!  News update...kitten back and medically fit!  His age, they now think, is between 8 & 12 weeks....I thought he was small for 15 weeks.

The blog candy is still there, I'm really hoping I can send it to someone soon! 

Thank-you to all the lovely ladies who came to the workshop at the weekend, it was slightly chaotic but, I hope you agree, good fun!  The next one is in November (dates on the sidebar). 

Hope to see some of you at the weekend, come over and say hello.  Many thanks for visiting today and leaving comments.  I'll try my best to visit as many as possible of you over the next couple of days.

Tuesday, 16 April 2013

La Coruna

Today we're in La Coruna, Spain...we could play "Where in the World is she Today!"
I thought I'd post another card I made using gilding flakes for Ally Pally.
I've embossed the cogs and gears mask using the Grand Calibur.  Then I picked up some gilding glue on a piece of Cut 'n Dry and swiped it over areas of the card and applied the gilding flakes.
The main image has been stamped with Black Archival and I've used 2nd generation stamping for the other images to give a more faded effect.
I've added faux pearls around the edge with Black PVA glue (Cosmic Shimmer).
The findings are all Tim Holtz bits and pieces.
All of the products I've used are from Creative Expressions.
Many thanks for stopping by and looking.

Monday, 15 April 2013

Safely on Board!

We're all unpacked and have the cabin looking like home...except there's no craft stuff in here!  There's definitely no trace of gilding flakes which seem to be everywhere at home!
Anyway, a day at sea today so a chance to relax with a good book or 2 and watch Steve (the better/other half) perform his comedy songs.
I'm sorry I didn't do it yesterday (I was a bit frazzled) but I just wanted to say a big thank you to everyone who stopped by the Rubbernecker stand and said hello...also for coming in to the demo's.  I had a ball and hope you did too.
This is another sample card I made for the show.
I've used the cog mask which I've embossed, then with the mask still in place, I applied the glitter and flake glue.  After removing the mask I applied the Copper Cosmic Shimmer Gilding Flakes.
The Main central images are from some of the Steampunk stamps from Creative Expressions.  I "inked" up the satamps with some of the glue (on a piece of Cut 'n Dry Foam), stamped it onto black card then applied the gilding over the top.
A tip when using the glue on stamps.....don't press the cut 'n dry too firmly when "inking" up.....just light gentle tapping.  Don't press the stamp down too hard onto the card...it's a very strong glue and you might pull away the top layer of the card when you lift the stamp.  Experiment with it...it's worth the effort.
Anyway, my books await and it's a good murder (or research as I tell my husband!) so I shall leave you for today.
It was fantastic seeing so many of you on Saturday and it's always a joy to work with Sue Wilson.
My postings will be a bit sketchy over the next 3 weeks but do check in and I'll post when I can.  I'll definitely be back to normal on 7th May at the latest!
Many thanks for visiting.

Saturday, 13 April 2013

Ally Pally Sample

Happy Ally Pally everyone!
Here's a sample I made for the show using the Silver Gilding Flakes.
I covered a piece of wood with Tim Holtz paper and using a piece of Cut 'n Dry foam swiped the gilding glue around the edge.  Then with another piece of foam I applied some Eco-Green Acrylic paint in black.  I did the same to the smaller heart which I also stamped a message on and highlighted some of the words with Crystal Lacquer.
For the larger heart, I covered it with the same paper but this time stamped images from the "Falling Leaves" set of stamps using the gilding glue.  The silver gilding flakes went on next.
The 2 roses are made from a stamp in the Button Floral set (Hels used it in her C&C show last week) and the other flower is a Spellbinder Die.  I've dipped them in my Melt Pot with clear UTEE.
Everything I've used is available from Creative Expressions (apart from the wood and the hearts...they were in my stash!) 
Hope you like it and maybe you'll come to the demo and see the "real thing!"
Hope you all have a good day and thanks for visiting.

Friday, 12 April 2013

PVA Crackle

Today's offering is a card we'll be making at the May 18th workshop at Martells in Cliftonville.
I used a size 8 tag and painted it with blue Eco Green acrylic paint then applied a layer of PVA glue.  Dried it a little then painted over it with white acrylic.  Next, heat up wuth your heat gun and crackles will appear.  I very gently applied Black Soot Distress Ink around the edges.
The stamps are from Creative Expressions.
The background was made using Faded Jeans Distress Ink and a wet smooshing technique.  I roughed up the edges with a pair of scissors then distressed with Black Soot again.
This is only a very quick post as we're off to Ally Pally at 7am and we still need to load the car up and I need more tea!!
Hope to see you there and thanks for stopping by. 

Thursday, 11 April 2013

One of the Demo's

I thought I'd show you something I've been getting ready for Ally Pally on Saturday.
This is such a nice easy card to make and would be great for a wedding or maybe a Golden Anniversary.
First of all I applied the double sided adhesive sheet to the back of some heat embossable acetate.  Next, apply gilding flakes after making sure that your blown air wall heater isn't going to come on!  The images were stamped with Black Archival and heat embossed with Cosmic Shimmer Clear Powder.....tip....use an anti static bag over the acetate before you stamp.  Also, although the acetate is able to take some heat, don't leave the heat gun in one position for too long.  Make sure you move it on as soon as the powder has turned.
Everything was matted and layered onto black and white card.  The faux pearls around the edge are 2 different colours of Cosmic Shimmer Pearl Glue.  If you look carefully under the bow you can see a small metal charm that I've also applied gilding flakes to (it was silver).  Just put some of the special gilding glue onto a piece of Cut 'n Dry foam and dab onto the charm then add the flakes and buff off.   I made a double bow with some seam binding and added a dazzler to finish.  Everything is available from Creative Expressions.
Thank you to everyone who stopped by yesterday and left such lovely comments.  I'm going to try and visit a few more blogs today...apologies if I don't get to everyone.
The packing is almost done for the cruise and the samples are almost finished for Ally Pally.  Just one more tag art for the afternoon demo and one more gilding flake demo for the morning.  Then it's bags packed and leave home at 7am.  If all goes well we should be at Ally Pally about 9am ready to help Sue set up the Rubbernecker stand.
Did you catch her shows yesterday...what great ideas with the Spellbinders.  If you missed any (or have no idea what I'm talking about) you can see some of Sue's beautiful cards on her blog which she posts EVERY day.  Visit:  http://particraft.blogspot.com
Anyway, enough waffling from me.  Off to the studio to finish off and hope to see some of you on Saturday.

Wednesday, 10 April 2013

WOYWW

Happy WOYWW to one and all.
Well as you can see, mine is a complete mess again!
I've been working on demo samples for Ally Pally and have had a great time covering myself and everything else with gilding flakes.  I've warned the family that they had better not stay still for too long otherwise I'll gild them as well! 
I've also been playing with some home décor which is something I've never really done before but have fallen in love with.
For this one I've used the Studio490 Art Parts.  The stamps are by Sam Poole for Creative Expressions and are the Vintage Baking set.  I bought them ages ago and had forgotten about them but they seemed just right for this wall hanging.  The roses were made from the Button Floral stamp set (again Sam and CE).  They've been dipped in the Melt Pot with clear UTEE as have all the little stamped images and the message.  I cut out the shape for the message before I dipped in in the UTEE.  I didn't have the right size die for the matt so I drew around the outside of the shape and cut it out by hand.  It's a great way of getting more from your dies.
The papers are from a Tim Holtz pad.
I used some wire that I twisted around a pencil for the hanger and added some ribbon scraps to finish.
Hope you like it.
Getting VERY excited about Ally Pally now.  I do love to demo and have got some lovely projects ready with the gilding flakes so hope to see some of you there.....if only to see how much of a mess I can get in.....that glue is soooo strong!!
Don't forget Sue is on C&C and Ideal World today with her amazing Spellbinder shows.  Come and see her on the Rubbernecker stand at Ally Pally this weekend.  Sam Poole will be on the Creative Expressions stand as will Julia Watts and on Sunday they'll be joined by Hels and Leonie.
The blog candy is still up for grabs.  To enter, find the posting further down and follow the instructions.
Right, back to the studio to prep for the afternoon demo!
Thank you so much for visiting and leaving comments.

Tuesday, 9 April 2013

Mixing it up

I do wish that the photo had come out better!
You're going to have to use your imagination a bit with this.
The background was made by inking up a mask with Perfect Medium, running it through the Grand Calibur with black card then adding clear embossing powder and heating.  Tip: use your anti-static bag on the card before you start!
The tag was a really cheap and nasty one from a stationers..I don't think they'd recognise it now!
I inked it up with Perfect Medium and added UTEE then heated.  Next I got a teaspoon and added some silver and black emboss powders (Cosmic Shimmer) in different areas on the tag and heated again.  I always let it cool and then apply Perfect Medium between each stage.  When you're happy with the coverage, heat it again and, using a teaspoon, add some Luna Silver Mica Flakes and Micro Beads.  They stick really well into the UTEE.
The tag was put on with 3d foam pads after I'd removed the string and added some ribbon instead.
In real life the card is very sparkly.  It's one that we're making at the May 18th workshop at Martells.  Hope you like it.
The very fab Sue Wilson has a Pick of the Day on Create & Craft from 9pm tonight so don't miss the shows....they're bound to be fab.
I'm up to my neck in packing for the cruise.  I'm sure that most of the clothes have a sprinkling of gilding flakes on them!  It's a fairly tight schedule as we get home from Ally Pally on Saturday evening and leave for the cruise on Sunday morning.  This is where organisation comes into it's own....does anyone know where I can buy some!!
Back down to the studio for more sample making ready for Saturday.  Hope you all have a fun, crafty day and thank you for visiting.

Monday, 8 April 2013

Floral Wall Hanging

 This is definitely something very different for me!  I don't usually do "pretty" being a much more grungy type but I had a lot of fun with this.
I bought a shaped plaque from Ally Pally last September which has sat unloved in a cupboard ever since so I thought it was time to give it a new lease of life!
It's been covered with Tim Holtz paper which was distressed around the edge with Weathered Wood ink.
The flowers are a mix of some Paper Artsy Stamps and Spellbinder Dies.  The leaves and swirls are all Spellbinder dies as well.  I've stamped some images and words from stamps in my stash.  The bird was another unloved bit of stash from my cupboard which I've painted with white acrylic paint then stamped with swirls.
I've put a piccie on showing a bit of a close up.
That's it for today, thanks for visiting.  Hope you like the finished project.