About Me

My photo
Hi, I'm Pam and thank you for visiting my blog. I have been making cards for over 10 years and am an independent demonstrator for Creative Expressions. I am lucky enough to teach on cruise ships and also get the chance to demo at The Big Stamping and Scrapbooking Show at Alexander Palace. I run workshops for a local craft shop and if anyone would like details of the them please e-mail me at stephen.smith870@ntlworld.com I love to scrapbook but my all time favourite thing is to get messy with ink!
Showing posts with label Micro Beads. Show all posts

Tuesday, 28 April 2015

Butterfly Dreams

Good Morning All and a very Happy Tuesday!

I'm back again with another project using the stamps designed for Creative Expressions by Johnathon Lockwood.  This time I've used the "Elements stamps- Butterfly Dreams"

So, let's get started....

Apply Honeycomb, Sunshine Yellow and Sunset Orange Alcohol Inks to a piece of gloss card.

Ink up the "Butterfly Dreams" Striplet Stamp with Black Archival Ink and  stamp onto the gloss card.

Cut out the panels and edge with the Archival Ink.

Emboss a piece of Coconut White Card with the A4 Leafy Montage Folder.
Lightly apply Wild Honey and Rusty Hinge Distress Inks to highlight the raised areas.
Matt and layer onto Black Foundations Card.

Matt and layer the panels and glue onto the background.

Ink up the Oval stamp from the A5 set with the sentiment in place.

Heat emboss with Cosmic Shimmer Clear Embossing Powder.
Paint the butterflies with the same Distress Inks as before.

Cover with Double Sided Adhesive, cut out the oval, remove the backing paper, then add Micro Beads.

Die cut a matt using the Californian Collection-Napa Valley Dies.
Glue the oval into place.
Attach to the card with 3d foam pads.

Cut out some flowers using the Delicate Daisies Complete Petals in Black card, then using white card, die cut the Delicate Daisies-Open Petals.
Glue them together and stick them into position on the card.

Add small Black Dazzlers to the flower centres.
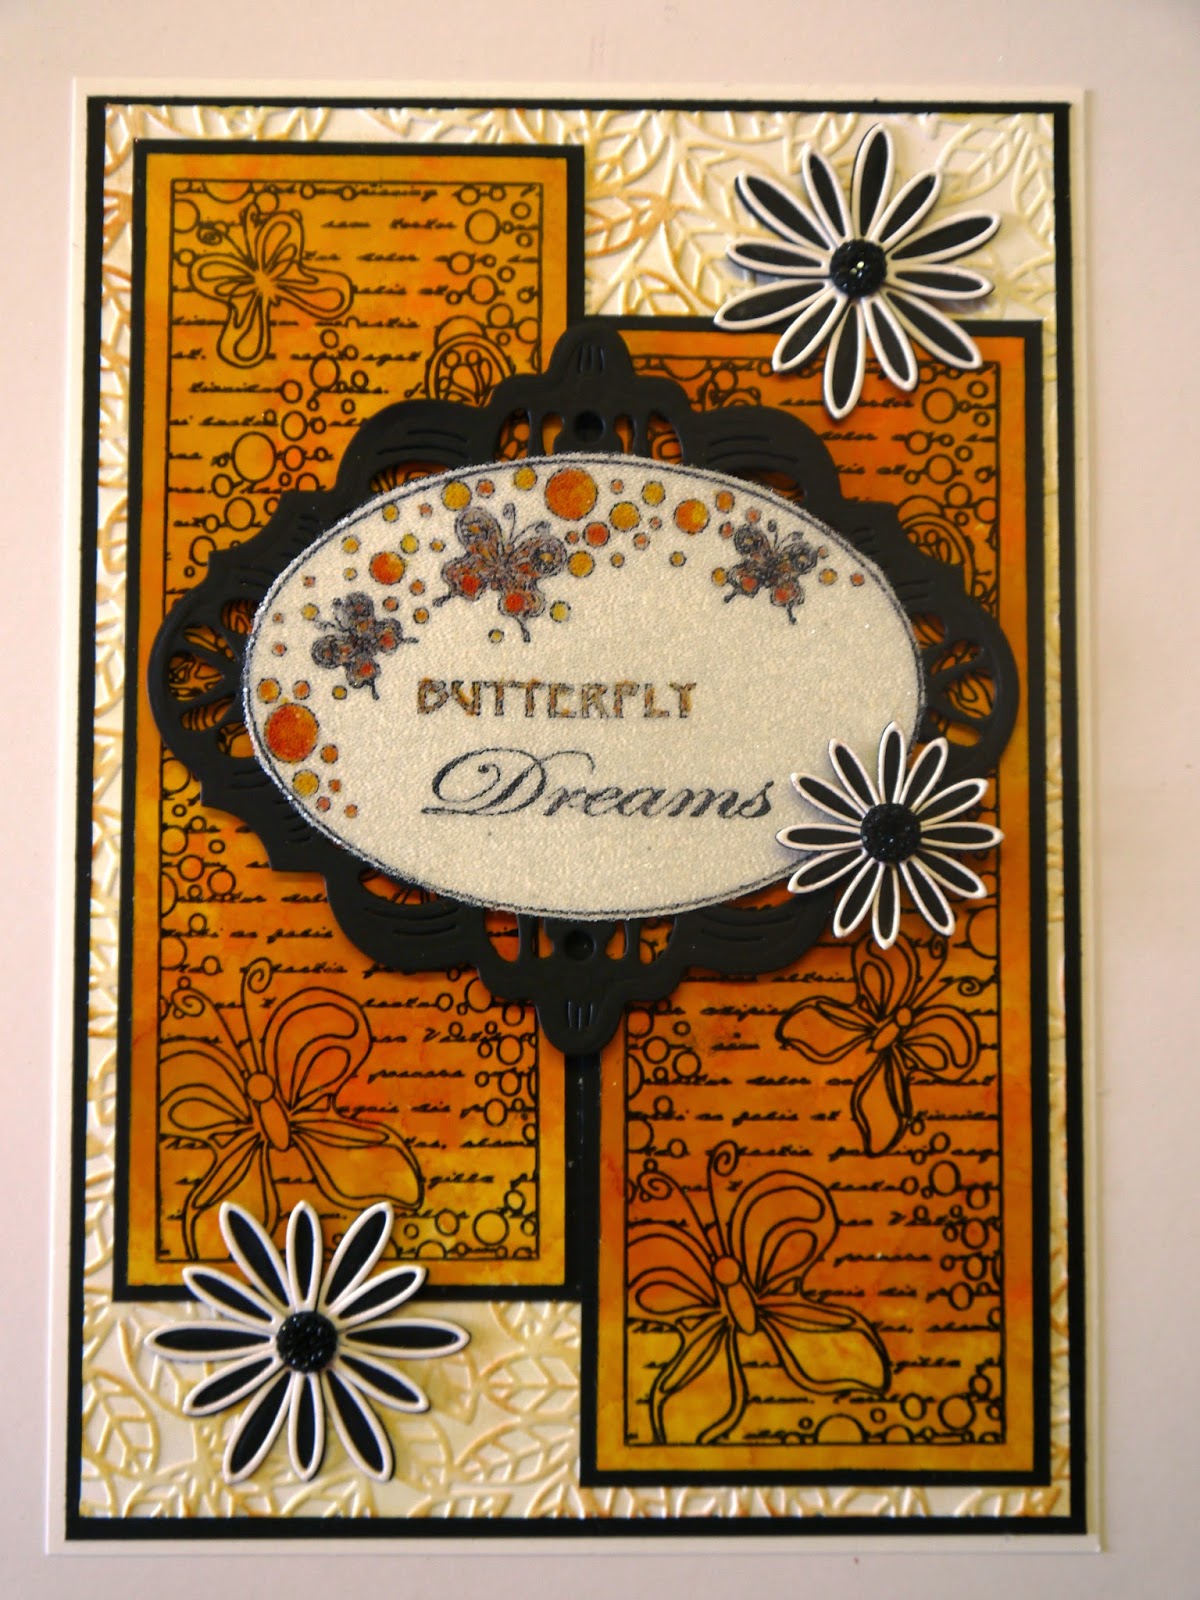
And there's the finished card!

I do apologise about the glare in the photos....I must have chosen the sunniest day of the year so far to make this one!

Well, that's all for this week...many thanks for stopping by and leaving comments, they are much appreciated.

I should be in Turkey while you're reading this....not long before we get home!

Until next time....have a happy, crafty week!

Tuesday, 29 July 2014

Black and Gold

Good Morning All and a very Happy Tuesday!

Well, this is the last July DT piece for Creative Expressions using the gorgeous Masks I was sent to play with so I thought I'd come up with a real "classy" number!

Anyway, here goes.......

Cover a piece of Teresa Collins paper with Creative Expressions Double Sided Adhesive.

Apply Perfect Medium to the mask to help it release and apply Micro Beads.

Remove the mask and sprinkle Cosmic Shimmer Aurora Crystal Sparkle Emboss Powder over the paper and heat carefully.

Cut out with Spellbinders Grand Circle Dies.  Matt and layer with Teresa Collins Paper cut with the Spellbinders Grand Scalloped Circles.

Emboss a piece of Coconut White card using the Creative Expressions A4 Heart Lattice Folder.
Matt and layer with black card and the same paper as the main design.  Add a length of Black Crushed Satin Ribbon.

Use 3d foam pads to attach the circle to the card.

Make "faux" pearls around the edges with Cosmic Shimmer Golden Pearl Coloured Pearlescent PVA Glue.

 
Using Black Card, die cut the Faux Quilled Blooms and the D-Lites Fantastic Flourish 1.  Cut the flourish into smaller sections and glue to the card.  Glue the flowers into place and add the Coloured PVA Glue to the flower centres.
 
 
And there's the finished card!
 
I hope you like this one, it's not inky at all which isn't like me!!
 
Well, that's it for today.  I'll be back in the morning with a Creative Studios project so I do hope you'll stop by for a look.  Many thanks for visiting and any comments you leave.  Just a quick reminder that Crafty Sunday is on 3rd August at my place....usual times (although you can stay after 4pm so warn your husbands!!)
 
Hope to see some of you there!

Tuesday, 12 November 2013

Loving the Winter Flowers!

Good Morning All, hope everyone is well and in fine fettle!

Today is my Creative Expressions Design Team blog day and I've used the gorgeous Winter Flowers A5 stamp set again.  I just can't stop playing with them!!

So here we go with a step by step.

Die cut a Spellbinders Labels8 from the Creative Expressions Double Sided Adhesive Sheets.  Remove one of the backing pieces and add 4 or 5 drops of Sunshine Yellow Alcohol Ink and the same amount of Sunset Orange.  Use the backing paper to smoosh the ink down onto the adhesive.

Apply Warm Sunrise Gilding Flakes over the top of the ink.

 
Turn it over and remove the other piece of backing paper.  Stamp the Snowdrop with Black Archival Ink directly onto the adhesive sheet.  Colour in the flowers with Alcohol Ink Pens.  Cover with Micro Beads.  Matt and layer onto a white


Labels 8 die cut.  Edge with gold pen.
 
Draw around the outside edge of the same die onto Creative Expressions Dark Roast Coffee Foundations Cardstock and cut out.  Matt and layer.
 
Dry emboss a piece of Coconut White Cardstock with the M-Bossabilities Dainty Dots Folder.  Cut a strip of white card for the side panel and emboss again.  Matt and layer onto the coffee card.
 
Using the same technique as before, make a strip of the double sided adhesive with Gilding Flakes and Micro Beads.
Matt and layer.


Mount the snowdrop panel onto the card with 3d foam pads.  Tie a bow with Rust Satin Ribbon.  Colour a Silver Dazzler and 2 Pearl Stick Pins with Alcohol Ink Pens and attach to the card. 
 
I've also added a little bit of a gold chain I had in my stash.


This is another one of those times I wish you could see it for real instead of a photo!  The shine on the card is fab!  I was surprised how well the Alcohol Inks worked and that the Gilding Flakes still stuck.
 
Well, that's all for today, back tomorrow with WOYWW and a Christmas Card for Creative Studios.
 
Don't forget the blog candy, just 9 more to go!  Do have a look at the Creative Expressions Website, there's a link to the Design Team Blogs on the right.
Many thanks for your visit and comments.
 

Tuesday, 5 November 2013

Winter Flowers ...2nd Installment!

Good Morning All and a very Happy Tuesday!

I'm really enjoying using the Winter Flowers set of stamps from Creative Expressions and thought I'd show you a card today made with the Crocus stamp.  It's nice to think that Spring will be here eventually!

So here we go!

Stamp the Crocus onto Coconut White Cardstock with Black Archival Ink allowing enough room to die cut later.
Stamp the Crocus again onto a Post-it note with as much on the sticky strip as possible.  Cut out just inside the black line.


Using the cut out as a mask, cover over the stamped Crocus and stamp again to the left of it, then to the right.  Stamp slightly higher than the original one.
Paint the leaves with Shabby Shutters and Peeled Paint Distress Inks.  Paint the flowers using Milled Lavender, Dusty Concord and Chipped Sapphire Distress Inks.


Cover with Creative Expressions Double Sided Adhesive and die cut with Spellbinders Labels 28.  Take off the backing sheet and apply Micro Beads.
Draw around the outer edge of the die on Dark Roast Coffee Cardstock and cut out to make a matt slightly larger than the previous one.


Using the Creative Expressions A4 Basket Weave Embossing Folder, dry emboss a piece of Coconut White Cardstock.
Stamp the word "Crocus" onto a strip of card with Dusty Concord Distress Ink.  Lightly distress the edges with the same ink.  Matt and layer onto a piece of the Coffee Card.


Tie a triple bow with Purple Seam Binding, spritz it with water and scrumple up.  Dry with a heat gun. 
Mount the Crocus picture onto the card with 3d foam pads.
Attach the bow with a glue dot.

Stamp "With Love" onto Coconut white card using Dusty Concord Ink and die cut with Labels 28.  With the die still in place, distress with the same ink.  Draw around the outer edge of the die onto the Coffee card and cut out to make a matt.  Curve the tag and attach to the card using Cosmic Shimmer Dries Clear Glue and a 3d foam pad.
Add a Dazzler to the centre of the bow to finish.


I do wish that I had screen that allowed you to touch the picture so that you could get the full effect of the Micro Beads!

Well, that's all for today.  I'll be back again next Tuesday with another project using the Winter Flowers.  Until then, do pop over to the Creative Expressions blog so that you can see what the other members of the Design Team are up to!
Also, Just 12 more followers before I draw for the blog candy!  Until next time, have a happy crafty week!

Saturday, 19 October 2013

Not Long Now!!!

Time to get started on those Christmas cards!  Today I thought I show a card I made using a fantastic technique that the wonderful Sue Wilson was demonstrating at Ally Pally last month.  I just hope that my lousy photography does it justice!


To start, cut a piece of Coconut White cardstock to size and cover with Creative Expressions Double Sided Adhesive Sheet.  Coat the Holly Wreath Mask with Perfect Medium Ink and place down on the double sided adhesive.  Apply Cosmic Shimmer Summer Meadow Gilding Flakes through the mask making sure that you get rid of any excess before removing the mask.  Remove mask and apply Creative Expressions Micro Beads.


Dry emboss another piece of the Coconut White card using the Basket Weave Creative Expressions A4 Folder.  Cut another piece of the card slightly larger and lay down double sided tape all the way around the edges.  Apply the Golding Flakes to the tape.


Lightly apply some Golden Light Gilding Wax over the embossed piece of card.
Stamp the sentiment with Perfect Medium and heat emboss with Cosmic Shimmer Bright Gold Powder.  Die cut using Spellbinders Fleur de Lis Motifs.  Die cut a 2nd Motif after applying a piece of the double sided sheet to a piece of card.  Remove the backing and apply the Gilding Flakes to it.


Stick onto the card with 3d foam pads after gluing the sentiment over the gold motif.  To finish, add a bow and a Red Dazzler.


I hope you like it and a big thank you so Sue for showing me how to do it!

Well, that's it for today.  I'm busy beavering away on some secret DT pieces!!!  We're nearly at the target for the blog candy so just another 15 to sign up to follow then I'll have the draw.  Until next time, have a happy, healthy, crafty week!

Tuesday, 9 April 2013

Mixing it up

I do wish that the photo had come out better!
You're going to have to use your imagination a bit with this.
The background was made by inking up a mask with Perfect Medium, running it through the Grand Calibur with black card then adding clear embossing powder and heating.  Tip: use your anti-static bag on the card before you start!
The tag was a really cheap and nasty one from a stationers..I don't think they'd recognise it now!
I inked it up with Perfect Medium and added UTEE then heated.  Next I got a teaspoon and added some silver and black emboss powders (Cosmic Shimmer) in different areas on the tag and heated again.  I always let it cool and then apply Perfect Medium between each stage.  When you're happy with the coverage, heat it again and, using a teaspoon, add some Luna Silver Mica Flakes and Micro Beads.  They stick really well into the UTEE.
The tag was put on with 3d foam pads after I'd removed the string and added some ribbon instead.
In real life the card is very sparkly.  It's one that we're making at the May 18th workshop at Martells.  Hope you like it.
The very fab Sue Wilson has a Pick of the Day on Create & Craft from 9pm tonight so don't miss the shows....they're bound to be fab.
I'm up to my neck in packing for the cruise.  I'm sure that most of the clothes have a sprinkling of gilding flakes on them!  It's a fairly tight schedule as we get home from Ally Pally on Saturday evening and leave for the cruise on Sunday morning.  This is where organisation comes into it's own....does anyone know where I can buy some!!
Back down to the studio for more sample making ready for Saturday.  Hope you all have a fun, crafty day and thank you for visiting.

Saturday, 30 March 2013

While it's Cold!

Thought I'd post a Christmas card I've designed for the September workshop at Martells!  I know, it's Easter, but while the weather is so chilly it almost seams right for an Easter card this year!
 
I've used Studio 490 stamps for the message and red stamped background.
In the set is the most gorgeous swirl which I stamped 4 times in Crimson Archival ink.
Before that, I used the Micro Dot mask to emboss the white card in the Grand Calibur and inked the edge with Peeled Paint Distress Ink.
The holly leaves are also in the same set of stamps but much bigger!  I thought I'd get out my Shrink Plastic for these...it's been on the shelf for ages.  After stamping, I coloured them with Promarkers, then heat shrank them.  Cosmic Shimmer Dries Clear Glue works a treat for gluing them into place.
The matt for the message was cut with Spellbinder dies.
I stamped the message onto the white card before cutting it and covered it with double sided adhesive.  After it had been cut, I covered it with Micro Beads.  You can just about see the sparkle.
I may have got a new camera but the photography hasn't improved!
Well, that's it for today,  Hope you're all having a good Easter Break and relaxing.
Should be back tomorrow but we're planning on going to a Boot Fair...I want to buy some bits to "alter!"
Happy Easter to all.

Tuesday, 26 March 2013

Simples!

 
Lace work style card
 

This is such a nice quick card to make and looks so effective when it's finished.
 
I've used a Spellbinder die for the pinwheel in the centre.  Firstly, cut a square of card to the right size then cover it with a double sided adhesive sheet.  Run it through the Grand Calibur with the die.  Remove the die and covering from the adhesive sheet and dip it into a container of Micro Beads.  Make sure that you press the Micro Beads firmly into place.
 
The next step was to run the white card through the Grand Calibur with a mask for an embossed look.
 
I cut out 4 corners with a Spellbinder die and glued them onto the main card before matting and layering.
 
The final touch was a Black Dazzler for the centre.
 
This is one of the cards we'll be making at a forthcoming workshop at Martell Press.
 
All of the products mentioned are from Creative Expressions and if you go to their website you can find a list of local retailers.
 
Hope you all managed to see Dee yesterday on Create and Craft...she had some great ideas for using gilding flakes which I can't wait to try.
 
I'm really looking forward to the demo at Martell Press on 3rd April and hope to see some of you there.
 
Until next time, hope you all stay warm and safe in this crazy weather we're having!