Good Morning All and a very Happy Thursday!
I'm back with another one of the new Sue Wilson Festive Collection Dies and this one is gorgeous!!!!
So without further ado...let's get started....
Apply swirls of Broken China, Faded Jeans and Dusty Concord Distress Inks to a piece of Coconut White Card.
Spritz lightly with water, dab with a piece of kitchen towel then dry.
Go around the edges with the Faded Jeans Distress Ink. Use Cut 'n Dry foam for applying the inks.
Apply some Cosmic Shimmer Flake and Glitter Glue to the small star stamp (designed by Sam Poole last year for Creative Expressions....still available!). Stamp onto the distressed background and add Cosmic Shimmer Silver Moon Gilding Flakes,
Matt and layer onto Foundations Vintage Silver Card then glue onto a 6x6 card blank.
Die cut the Festive Collection-Dove of Peace (which includes the word "Peace") twice from Coconut White card.
On one of the doves, lightly apply some Broken China Distress ink.
Glue the 2 doves together leaving the wings free.
Glue into position on the card and shape the top wing.
Glue the words onto position and you're finished!
I hope you like it! It was really nice to get inky...sometimes we forget to use the older techniques but this worked so well with the dove.
Well, that's it for this week. I will be giving away one of the cards again this month so on the blog for the 27th, tell me which one is your favourite from this months selection and it could be winging its way to you!
Until next time, have a happy, crafty week!
Good Morning All and a Very Happy Tuesday!
While I was at Ally Pally a few weeks ago, I showed how to make a background for a card using net curtain. I was asked if I would put the instructions on my blog and here it is!
Cut a square of card slightly larger than needed and put the required size of double sided adhesive sheet on it.
Select your piece of net curtain! Ideally, it should have a large open weave. Charity shops are great places for finding nets.
Select 3 colours of Cosmic Shimmer Polished Silk Glitters and apply one colour at a time with a small spoon. I've used Vintage Violet, Lavender and Sea Green.
Remove the net curtain and add Cosmic Shimmer Diamond Snow to fill in any areas not covered by the glitter.
Matt and layer onto Black Foundations and Coconut White Card.
Stamp the sentiment from Phill Martins Decadent Damask Birthday Verses with Black Archival Ink. Heat emboss with Cosmic Shimmer Clear Powder.
Cut out using the Sue Wilson Greek Island, Santorini Die Set. Distress the edges with Dusty Concord Ink.
Using the same set, cut the next size down in black card. Cut in half and glue to the back of the sentiment.
Add a length of black seam binding to the left hand side of the glittered background. Attach the background to the card blank.
Add the sentiment with 3d foam pads.
Die cut some Butterflies from the Finishing Touches-Magical Butterfly set using Black Card.
Glue into position. On the larger butterfly, add 3 dots of Cosmic Shimmer PVA Glue in Decadent Denim to finish.
And there's the finished card!
It's a very old technique and seemed to die out about 9 years ago. I thought it was time to revive it as the Glitters and Double Sided Adhesive Sheets are so much better now.
Everything (apart from the curtain!) has come from Creative Expressions.
Well, that's about it for today. I'll be back in the UK tomorrow and normal service will be resumed! I'm not sure what's happened to the colours in the last couple of photos.....we're having some serious computer issues at the moment...hopefully, it'll be sorted out soon.
As always, many thanks for stopping by and leaving comments. They are much appreciated. So until next time, have a happy, crafty week.
Good Morning All and a very Happy Tuesday!
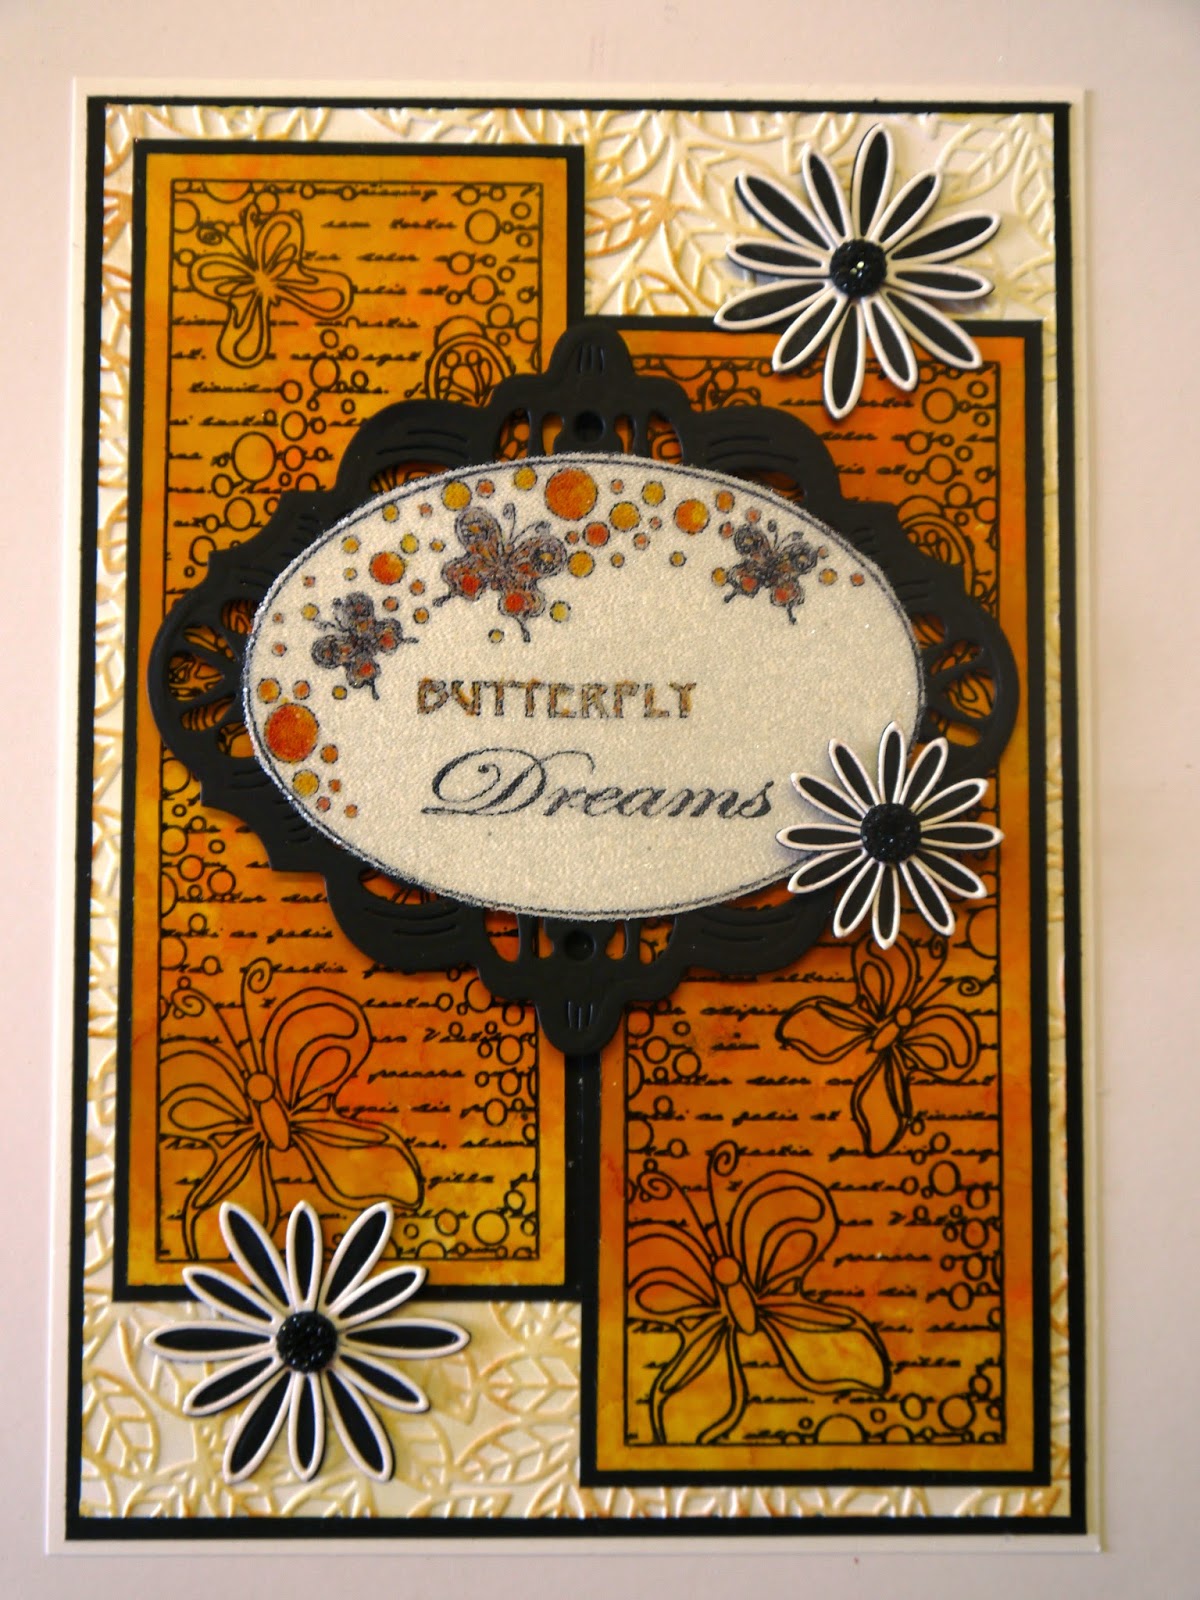
I'm back again with another project using the stamps designed for Creative Expressions by Johnathon Lockwood. This time I've used the "Elements stamps- Butterfly Dreams"
So, let's get started....
Apply Honeycomb, Sunshine Yellow and Sunset Orange Alcohol Inks to a piece of gloss card.
Ink up the "Butterfly Dreams" Striplet Stamp with Black Archival Ink and stamp onto the gloss card.
Cut out the panels and edge with the Archival Ink.
Emboss a piece of Coconut White Card with the A4 Leafy Montage Folder.
Lightly apply Wild Honey and Rusty Hinge Distress Inks to highlight the raised areas.
Matt and layer onto Black Foundations Card.
Matt and layer the panels and glue onto the background.
Ink up the Oval stamp from the A5 set with the sentiment in place.
Heat emboss with Cosmic Shimmer Clear Embossing Powder.
Paint the butterflies with the same Distress Inks as before.
Cover with Double Sided Adhesive, cut out the oval, remove the backing paper, then add Micro Beads.
Die cut a matt using the Californian Collection-Napa Valley Dies.
Glue the oval into place.
Attach to the card with 3d foam pads.
Cut out some flowers using the Delicate Daisies Complete Petals in Black card, then using white card, die cut the Delicate Daisies-Open Petals.
Glue them together and stick them into position on the card.
Add small Black Dazzlers to the flower centres.
And there's the finished card!
I do apologise about the glare in the photos....I must have chosen the sunniest day of the year so far to make this one!
Well, that's all for this week...many thanks for stopping by and leaving comments, they are much appreciated.
I should be in Turkey while you're reading this....not long before we get home!
Until next time....have a happy, crafty week!
Good Morning All and a very Happy Tuesday!
With all the sunshine we've been having, I couldn't help but use the gorgeous Sunflower stamps designed by Johnathon Lockwood for Creative Expressions.
They come in an A5 set called "Elements-Flower Frames"
So without further ado, let's get started.....
Stamp the sunflower and sentiment "Sending You Hugs" with Black Archival Ink onto Coconut White Card. Heat emboss with Cosmic Shimmer Clear Powder.
Paint the flower with Shabby Shutters, Peeled Paint , Wild Honey and Mustard Seed Distress Inks.
Trim to size.
Stamp the single sunflowers randomly onto a piece of Coconut White card and paint as before.
Matt and layer onto Black Foundations Card.
Stamp the single leaves and one flower onto a panel of white card.
Paint using the same colours as before, then matt and layer.
Glue to the left side of the card.
Matt and layer the main image and attach to the card with 3d foam pads.
Tie a triple bow from Black Seam Binding. Spritz with water, scrunch and dry. Glue into position before adding a Pastel Green Dazzler to the centre.
And there's the finished card!
The stamps are such good quality that you get a wonderfully clear impression every time.
I hope you like the finished project.....it's bright and cheerful and I hope would cheer anyone up that's in need of a hug!
Many thanks for stopping by and leaving comments....while you're reading this, we'll be flying out to Greece to meet the ship we're working on for the next 2 weeks. When I say "we", I mean my very talented OH....I'm just going to roadie for him this time!
I'll still be posting every Tuesday, you don't get rid of me as easily as that!
I did promise that I would post instructions for the glittered background I demo'd at Ally Pally, that will be on here soon so please keep checking in.
Until next time, have a happy, crafty week!
Good Morning All and a Very Happy Tuesday!
I can't believe that it's the end of the month already but that means this is the last blog using the new Couture Creations Dies and onto something new next week!!!
I think I've saved one of the best till last but I'll let you be the judges of that! Anyway, here goes....
Cut a square of Couture Creations Vintage Rose Garden paper to size and distress the edges with a pair of scissors.
Cut a strip of coordinating paper to size and distress with scissors. Glue onto the square of paper then matt and layer onto Black Foundations Card.
Cut an Oval using Spellbinders Classic Oval Large Dies from Coconut White Card. Leave the die in place and lightly distress with Antique Linen Ink.
Die cut Couture Creations Intricutz Vintage Rose Collection Garden Lamp from patterned paper.
Glue onto the oval.
Cut the same die using white card and cut off the banner at the bottom. Stamp the sentiment Breathe from the Creative Expressions A5 Art Sayings Stamps.
Glue onto the paper die.
Cut a Spellbinders Scalloped Oval from Black Card to matt.
Attach to the card with 3d foam pads.
Die cut Spellbinders Spiral Blossom 3 using paper from the pad. Roll into 3d flowers.
Use a little Shabby Shutters Distress Ink on the edges of the petals.
Glue onto the card.
Use the Spellbinders Foliage Dies to cut leaves from black card. Glue into position.
Cut the word "Smile" from one of the pieces of paper in the pad. Matt and layer onto black card.
Add to the main card with 3d foam pads to finish.
And there we have it!
I hope the instructions were clear!
Well, that's it for this week. As always, many thanks for your visit and leaving comments.
I'll be back next week with new goodies to show you and I might even leave a few hints about what I'll be demoing at Ally Pally!!!
Until next time, have a happy, crafty week!
Good Morning All and a very Happy Tuesday!
I'm still playing with the new Couture Creations Dies and having a ball! I love the fact that although they're very intricate, they cut beautifully and release so easily that I haven't even needed to use wax paper with them.
Anyway, on with this weeks project.
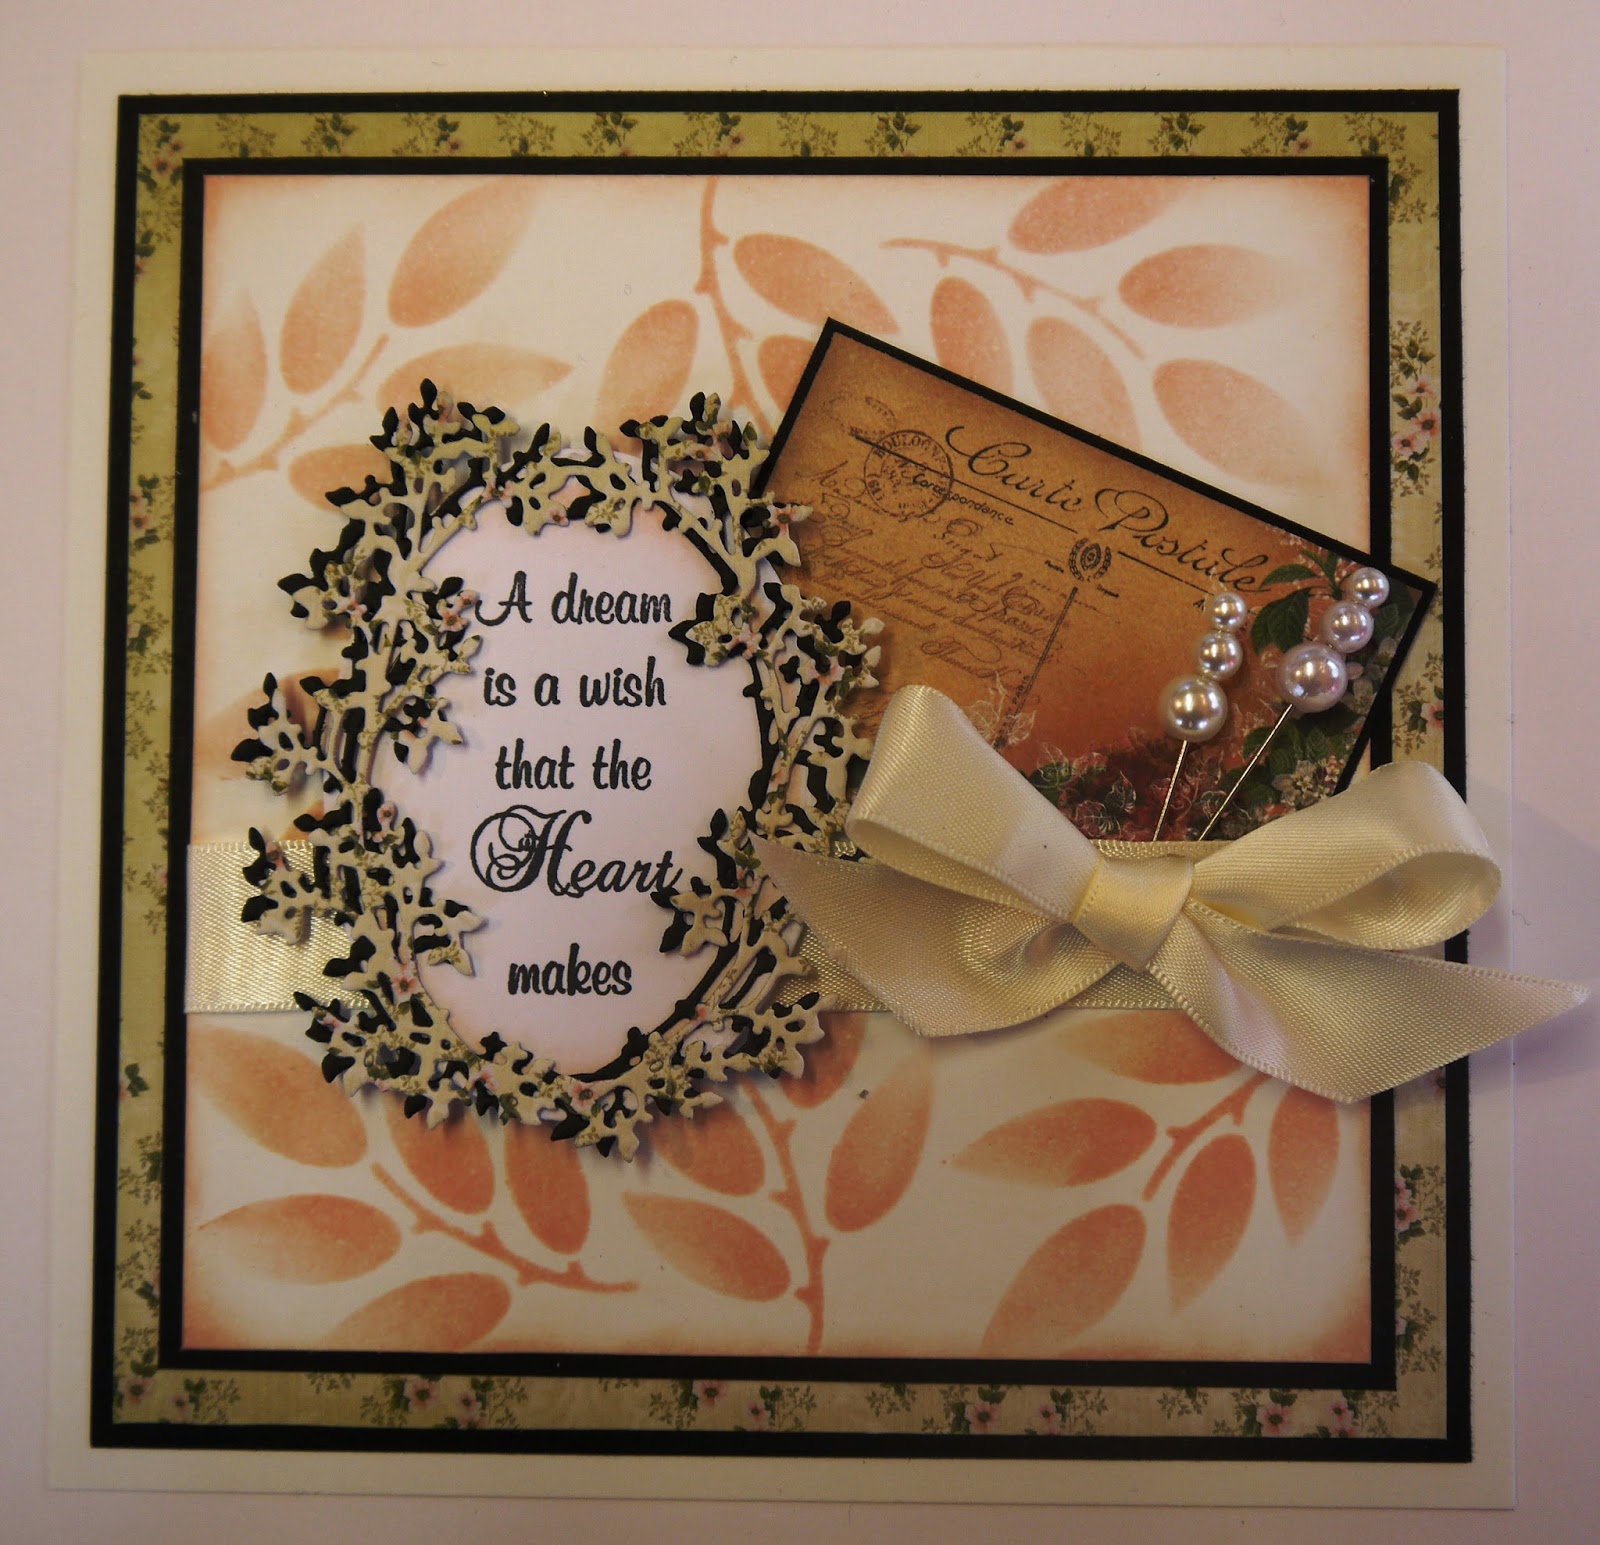
Stencil through the "Leafy" mask with Tattered Rose Distress Ink and trim to size.
Lightly distress around the edges with the same ink.
Die cut the Couture Creations Classic Vine from the Vintage Rose Collection in black Foundations card and again from Couture Creations Vintage Rose Garden 6x6 paper pad.
Glue them together off centre so that there is a shadow effect.
Stamp the sentiment from the A5 Dandelion Wishes stamp set onto Coconut White Card with Black Archival Ink.
Cut out with Spellbinders Classic Oval Large Dies.
Glue the vine into position.
Attach a length of Creative Expressions Finishing Touches 6mm Satin Ribbon to the Leafy background.
Matt and layer onto black card.
Glue onto a piece of the Couture Creations patterned paper, then matt onto black card before gluing onto the blank card.
Cut out one of the postcard images from the same papers and glue into position.
Add the oval topper with 3d foam pads.
Tie a bow from the same ribbon and attach with a glue dot.
Add 2 stick pins to finish.
And there we have it! Simple but elegant.
Everything used to make the card has come from Creative Expressions
I hope you like this weeks card...I've been working on next weeks project and it uses the last die that I was sent to work with. I'm very excited about how it's coming together!!!!
Well, that's it for this week. Many thanks for visiting and the comments.
Until next time, have a happy, crafty week!
Good Morning All and a Very Happy Tuesday!
Well, another week has flown by. Hope you all had a very happy Mothering Sunday and were spoiled rotten!
Todays card is one that I was really pleased with. I've used the Couture Creations Ornamental Lace Dies "Touch of Love" for the main focal point and everything used is from Creative Expressions.
So, let's get started.....
Emboss a piece of Coconut White Card with the A4 Rambling Blossoms Folder.
Highlight the raised areas with Shabby Shutters Distress Ink.
Matt and layer onto Black Foundations Card.
Did Cut 4 hearts using the Couture Creations Die from 2 different co-ordinating papers. I've used paper from the 6x6 Couture Creations Vintage Rose Garden Pad.
Glue onto the background with Cosmic Shimmer Dries Clear Glue.
Cut out a sentiment from the same paper pad. Matt and layer onto white card then attach to the centre of the hearts with 3d foam pads. Stick onto the main card.
Add dots of Cosmic Shimmer Pastel Green PVA Glue around the edges to finish. I've done mine quite randomly and different sizes.
And there's the finished card!
I hope you like it. The greens are just right for Spring and with a different sentiment it would make a gorgeous wedding card (or even with the same sentiment).
I've really enjoyed playing with these dies. They cut beautifully and with the brush tool from Spellbinders, they release really easily.
Well, that's it for this week. Many thanks for visiting and leaving comments.
So, until next time, have a happy, crafty week!
Good Morning All and a very Happy Tuesday!
As promised, I'm going to use Reverse Masking today to make a card using "Alfie", another Creative Expressions Singles Stamp.
Ink the stamp with Black Archival and stamp onto Coconut White Card.
Stamp again onto a piece of copier paper. Cut the dog out leaving a large area of paper around the cut out image.
Tape the paper over the stamped image.
Ink up the large dot Background Stamp with Saffron Archival and stamp over the masked image.
Remove the paper mask.
Using Distress Inks, paint the scarf and floor with Rusty Hinge and Alfie with Scattered Straw.
Matt and layer onto Chestnut and Ginger Foundations Card.
Stamp the Dot Background onto a larger piece of Coconut White Card with Saffron Archival Ink.
Emboss with the A4 Interlocking Circles Folder.
Highlight the raised areas with Scattered Straw Distress Ink.
Matt and layer with the Chestnut and Ginger Card.
Matt and layer strips of the same colour card and attach Yellow and White Bakers Twine.
Glue onto the background.
Stamp the sentiment from the "Paws-Itiveley" set onto the main image with Black Archival Ink.
Add to the main card with 3d foam pads.
And there's the finished card!
Hope you like it. Reverse Masking is a great way of adding detail to a stamped image. The stamp shouldn't have too much detail for this to work.
Anyway, that's it for this week. I'll be back next Tuesday with another project. Many thanks for stopping by and until next time, have a happy, crafty week!
Good Morning All and a very Happy Tuesday!
I'm back again with another design for Creative Expressions using the Singles Cats and Dogs range of stamps.
This time I've used the Triplets stamp so without further ado, let's get started....
Ink up the stamp with Black Archival and stamp onto Coconut White Card.
Paint the cats with Scattered Straw, Wild Honey and Gathered Twigs Distress Inks.
Paint the ball of wool with Festive Berries and the floor area with Tattered Rose.
Matt and layer the picture onto Foundations Ginger and Chestnut Card.
Matt and layer the same card onto a C5 sized card.
Cut a piece of Coconut White card to go onto the Ginger card.
Cut strips of Teresa Collins 8x8 paper and glue into place on the white card. Matt and layer onto the Ginger card.
Add some red and white Bakers Twine to the ball of wool and allow the edges to trail. Glue into place with Cosmic Shimmer Dries Clear Glue.
Stamp the sentiment from "Paws-Itively Great" onto Coconut White Card using Black Archival Ink.
Matt and layer as before.
Glue more Bakers Twine into position before adding the sentiment with 3d foam pads.
And there's the finished card!
Hope you like it, I love the sentiment...it really made me chuckle! I had a cat that used to do just that!!
Anyway, many thanks for visiting. I'll be back next Tuesday looking at a technique that I call Reverse Masking. Hope you can join me.
Until next time, have a happy, crafty week!
Good Morning All and a very Happy Tuesday!
I've finally had a chance to play with the gorgeous new stamps from Creative Expressions and here's my first one for the design team.
Squirt some very cheap Shaving Foam onto a plate. Level it out with a ruler then add drops of Dusty Concord and Broken China Distress Re-Inkers onto the shaving foam. Make swirly patterns in the foam.
Press a piece of Coconut White Card into the foam, lift off and remove the excess with a ruler. Wipe off any last bits with a piece of kitchen towel.
Ink up the Mix Things Up Singles stamp with Black Archival. Stamp over the swirly background then heat emboss with Cosmic Shimmer Clear Powder.
Distress the edges of the card with Dusty Concord Ink.
Matt an layer onto Coconut White and Black Foundations Card.
Stick onto the blank card. Stamp around the edges of the card with Black Archival Ink using the small sentiment and heart stamps from Creative Expressions A5 Vintage Cooking stamp set.
And there's the finished card!
Apart from the foam, everything used is from Creative Expressions.
I do love using the shaving foam technique but often forget about it! Sometimes it's good to re-visit old techniques!!
Well, that's it for today, I'll be back next Tuesday with another DT piece.
Have a happy, crafty week!!
Good Morning All and a Very Happy Tuesday!
I've gone with a very traditional look for today's project. I've used the A5 Christmas Florals Stamp Set from Creative Expressions for this card.
Well, enough chat, let's get started!
Ink up the Poinsettia stamp with Black Archival and stamp several times onto Coconut White Card. Heat emboss with Cosmic Shimmer Clear Powder.
Paint the flowers with Festive Berries Distress Ink.
Cover the card with a sheet of Double Sided Adhesive. Cover with Cosmic Shimmer Diamond Sprinkles then cut the flowers out.
Ink up the Poinsettia Stamp with Festive Berries Distress Ink then randomly stamp onto a piece of Coconut White Card.
Dry Emboss with the A4 Festive Swirls Folder.
Matt and layer using Ruby and Brunswick Green Foundations Cardstock.
Stamp the sentiment with Black Archival Ink onto Coconut White Card. Heat emboss with Clear Powder. Cut out with the Spellbinders Standard Circles Small Die. With the die still in position, distress with the Festive Berries Ink.
Cover with double sided adhesive then apply the Diamond Sprinkles. Cut out.
Draw around the outer edge of the die and cut out the circle.
Die cut 2 Spellbinder Scalloped Circles.
Matt and layer adding the sentiment with 3d foam pads.
Die cut the Festive Collection Pine Bough from the Brunswick Green Card. Glue into position on the card.
Glue some of the Poinsettias into place then add the rest with 3d foam pads.
Glue a piece of red Seam Binding to the back of the sentiment.
Attach to the card with 3d foam pads.
And there's the finished card!
I do hope you like it....you could add some gems to the flower centres for a bit of extra bling...after all, it is for Christmas and that's the one time of year you can really go to town!!!
Well, that's all for this week. Many thanks, as always, for visiting and leaving comments.
I'll be back next week with another project, this one isn't Christmas related but I have made it to give to a friend as a little Christmas present.
Until next time, have a happy, crafty week!