Good Morning All and a very Happy Thursday!!!
Hope I didn't catch too many of you out with the change of day!
Anyway, a new month which means new goodies from Creative Expressions to play with!
The stamp used in this card is called "Floribunda" and it matches the Sue Wilson Portuguese Collection - Lisbon Die Set.
So let's get started.....
Ink up the stamp with Perfect Medium and stamp onto Coconut White Card. Heat emboss using Cosmic Shimmer Bright Gold Metallic Powder.
Cut out using the largest of the Lisbon Dies.
Emboss a piece of Coconut White Card with the A4 Rambling Blossoms Folder.
Matt and layer onto Foundations Vintage Gold Card.
Attach to the blank C5 card.
Cut out the 2nd smallest complete die using the gold card.
Cut out again with the inner pattern in place, this time using Coconut White card.
Stamp the sentiment from the Flower Hearts Elements Stamp Set by John Lockwood using Perfect Medium onto the white card.
Heat emboss with the gold powder as before.
Glue the gold and white die cut shapes together.
Cut a strip of Creative Expressions Gold Tulle and tie a knot in the centre. Attach to the card with a dry glue dot then trim to the right length.
Add the floral stamp with 3d pads.
Add the sentiment with a double layer of 3d pads.
Cut out 2 of the Trailing Ivy Finishing Touches Dies from Coconut White Card.
Shape the leaves and attach to the card with glue and 3d pads.
And there's the finished card! It would make a lovely card for a Golden Wedding Anniversary. With a change of sentiment it could be used for so many occasions, my favourite sort of design!!
I hope you like it!
As always, everything used on here is from Creative Expressions.
Just leaves me to say, many thanks for stopping by and leaving comments, they are much appreciated.
I'll be back next Thursday with another design using the same die set....let's see how many ways I can think of using it!
Until next time, have a happy, crafty week!
Good Morning All and a very Happy Tuesday! I hope you all had a great Bank Holiday weekend...I know we did! We were in Huddersfield at the Grand Northern Ukulele Festival...yes, I'm a ukulele player!
Well, I'd better get on with this weeks card.....
Using the Cosmic Shimmer Decadent Denim Spray Mist, spray through the small dot mask onto Coconut White card.
Dry thoroughly.
Turn over and emboss with the A4 Fine Filials Folder.
Stamp the message from the Decadent Damask Birthday Verses and cut to size.
Use this as a template to cut diagonally onto the dotty card.
Fold back the 4 triangles.
Cut the card to size, then using a pencil (or similar) curl the four triangles and glue the tips down.
Stamp the sentiment again onto a piece of card that is larger than the aperture with Black Archival Ink and emboss with Cosmic Shimmer Clear Powder.
Glue into position behind the aperture.
Matt and layer onto Foundations French Navy Card before gluing onto a blank 8x8 card.
Die cut some Leaves from the Faux Quilled Leaves Set using the French Navy Card. Cut some flowers from the Camellia Open Petal Dies using French Navy Card and Closed Flower Dies using Coconut White Card. Glue the flowers together.
Place the leaves and flowers onto the card and glue into position. Add some 5mm and 8mm pearls to the flower centres and the 4 points of the triangles. Add 3mm pearls to the leaves. on the wording I've used the the Mini Swirls.
I've also used 2 of the white flowers with some Cosmic Shimmer Decadent Denim PVA Glue in the centres.
And that's the card finished!
Everything used for this card is from Creative Expressions.
Well, that's it for this week. My day for blogging has been changed to Thursday as from next week so I hope you'll still be able to visit me. Many thanks for stopping by and leaving comments, they're much appreciated.
So, until next Thursday, have a happy, crafty week!
Good Morning All and a very Happy Tuesday!
I've been playing this week with another set of stamps designed by Phill Martin. This time it's the Decadent Alphabet and Numbers, always useful to have in your stash!
Anyway, here we go......
Die cut 5 Spellbinder Classic Diamonds from the Vintage Rose Garden 12x12 paper pad.
Fold in half and stamp the letters from the Alphabet stamp set to spell out the word "Hello" using Black Archival Ink.
Cut 2 squares of coordinating paper from the same pad, matta nd layer them onto Black Foundations Card.
Emboss a square of Coconut White Card using the A4 Leafy Montage Folder. Matt and layer onto Black card. stick on the previous matting and layering.
Draw faux stitching around the triangles before folding them over a length of Bakers Twine. Glue the tips of the triangles so that you can still move them on the twine.
Drape over the card and tape at the back to fix into position. Glue onto a blank 8x8 card.
Use 3d foam pads to stick the triangles into position.
Fancy cut some Butterflies and Flowers from the same paper pad as before. Cut out the word "Smile" from the same pad, matt and layer onto Black card.
Glue the flowers into position. Shape the butterflies and glue on.
Add the wording with 3d foam pads.
And there's the finished card!
Not my usual style at all! But sometimes it's good to do something totally different and get out of your comfort zone!
A bit like this coming weekend when I'll be at the Grand Northern Ukulele Festival in Huddersfield having workshops with some of the best players in the world....I just hope I can keep up!
As always, everything used in this card is from Creative Expressions. So that just leaves me with a big thank you for visiting and leaving comments. I'll be back next Tuesday with another design using Phill's fab stamps. Until then, have a happy, crafty week.
Good Morning All and a very Happy Tuesday!
Well, we're back from our adventures on the high seas and trying to get back to normal...whatever that is! I'm just happy to have all the unpacking and washing done!!
This week I'm using the Decadent Damask Birthday Verses Stamps designed by Phill Martin for Creative Expressions. There are 4 large message stamps in the set, all with lovely birthday messages.
Anyway, let's get on with making a card!
Stamp the message with Black Archival Ink onto Coconut White Card. Heat emboss with Cosmic Shimmer Clear Powder.
Tear around the edges, then add Cosmic Shimmer Vintage Plum Gilding Wax to the torn areas.
Cut a square of paper from the Vintage Rose Garden 12x12 paper pad. Tear around the edges and apply the Gilding Wax as before.
Stamp a row of the border from the stamp set with Black Archival Ink.
Glue onto the card blank.
Ink up the Skeleton Leaves Striplet Stamp with Black Archival and stamp onto a piece of vellum. Heat emboss with the clear powder.
Add circles of Gilding Wax to the reverse side of the stamped image. I've used Vintage Plum, Golden Lilac and Summer Blue. Trim to size.
The first photo shows it from the reverse side and the 2nd one is what it looks like when you turn it over.
Glue onto the card with Cosmic Shimmer Dries Clear Glue.
Add the message with 3d foam pads.
Colour a 2nd piece of vellum with the same colour waxes.
Cut out flower shapes with the Finishing Touches Classic Rose Dies.
Use a brad to hold the flowers together then scrumple the flowers to give a bit of texture.
Die cut the Faux Quilled Leaves from Coconut White Card and glue into place. Add the flowers with 3d foam pads.
And there's the finished card!
I wasn't sure if the waxes would work on Vellum but they look gorgeous.
As always, everything I've used is from Creative Expressions.
That just leaves me to say a big thank you for stopping by and leaving comments, they're much appreciated.
So until next time, have a happy, crafty week!
Good Morning All and a Very Happy Tuesday!
While I was at Ally Pally a few weeks ago, I showed how to make a background for a card using net curtain. I was asked if I would put the instructions on my blog and here it is!
Cut a square of card slightly larger than needed and put the required size of double sided adhesive sheet on it.
Select your piece of net curtain! Ideally, it should have a large open weave. Charity shops are great places for finding nets.
Select 3 colours of Cosmic Shimmer Polished Silk Glitters and apply one colour at a time with a small spoon. I've used Vintage Violet, Lavender and Sea Green.
Remove the net curtain and add Cosmic Shimmer Diamond Snow to fill in any areas not covered by the glitter.
Matt and layer onto Black Foundations and Coconut White Card.
Stamp the sentiment from Phill Martins Decadent Damask Birthday Verses with Black Archival Ink. Heat emboss with Cosmic Shimmer Clear Powder.
Cut out using the Sue Wilson Greek Island, Santorini Die Set. Distress the edges with Dusty Concord Ink.
Using the same set, cut the next size down in black card. Cut in half and glue to the back of the sentiment.
Add a length of black seam binding to the left hand side of the glittered background. Attach the background to the card blank.
Add the sentiment with 3d foam pads.
Die cut some Butterflies from the Finishing Touches-Magical Butterfly set using Black Card.
Glue into position. On the larger butterfly, add 3 dots of Cosmic Shimmer PVA Glue in Decadent Denim to finish.
And there's the finished card!
It's a very old technique and seemed to die out about 9 years ago. I thought it was time to revive it as the Glitters and Double Sided Adhesive Sheets are so much better now.
Everything (apart from the curtain!) has come from Creative Expressions.
Well, that's about it for today. I'll be back in the UK tomorrow and normal service will be resumed! I'm not sure what's happened to the colours in the last couple of photos.....we're having some serious computer issues at the moment...hopefully, it'll be sorted out soon.
As always, many thanks for stopping by and leaving comments. They are much appreciated. So until next time, have a happy, crafty week.
Good Morning All and a very Happy Tuesday!
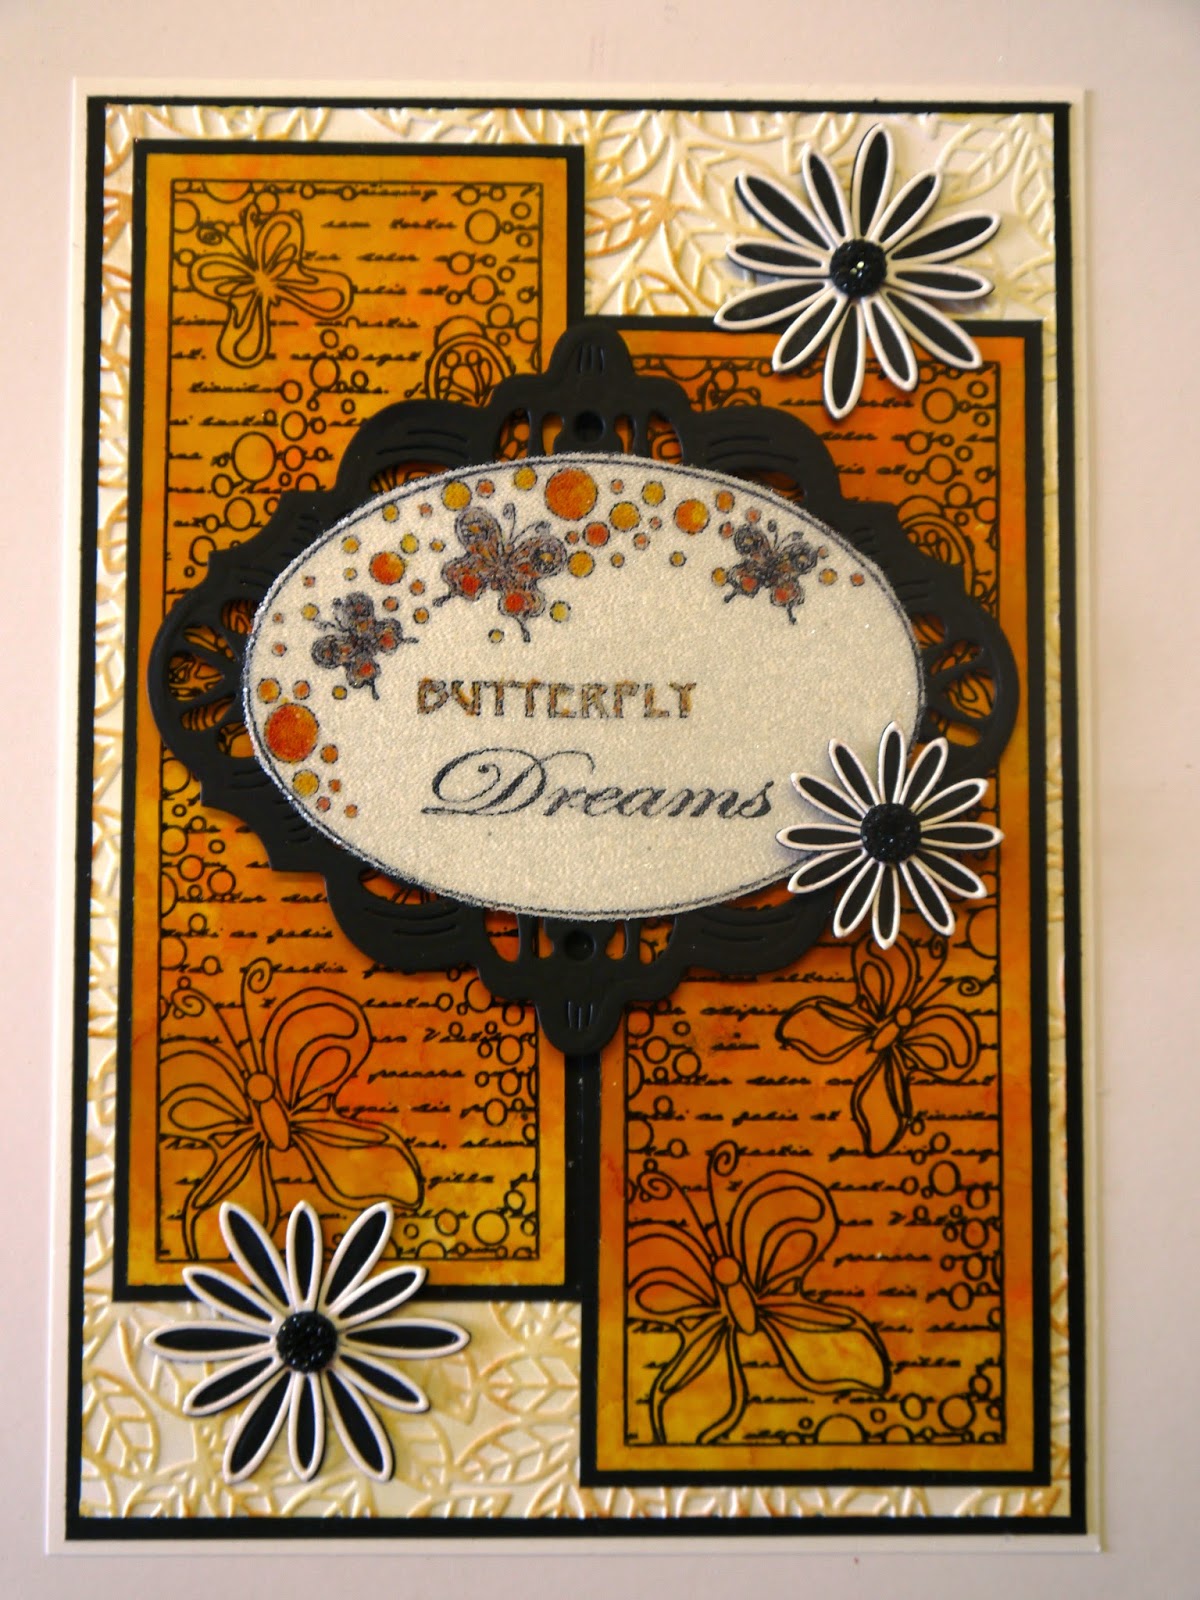
I'm back again with another project using the stamps designed for Creative Expressions by Johnathon Lockwood. This time I've used the "Elements stamps- Butterfly Dreams"
So, let's get started....
Apply Honeycomb, Sunshine Yellow and Sunset Orange Alcohol Inks to a piece of gloss card.
Ink up the "Butterfly Dreams" Striplet Stamp with Black Archival Ink and stamp onto the gloss card.
Cut out the panels and edge with the Archival Ink.
Emboss a piece of Coconut White Card with the A4 Leafy Montage Folder.
Lightly apply Wild Honey and Rusty Hinge Distress Inks to highlight the raised areas.
Matt and layer onto Black Foundations Card.
Matt and layer the panels and glue onto the background.
Ink up the Oval stamp from the A5 set with the sentiment in place.
Heat emboss with Cosmic Shimmer Clear Embossing Powder.
Paint the butterflies with the same Distress Inks as before.
Cover with Double Sided Adhesive, cut out the oval, remove the backing paper, then add Micro Beads.
Die cut a matt using the Californian Collection-Napa Valley Dies.
Glue the oval into place.
Attach to the card with 3d foam pads.
Cut out some flowers using the Delicate Daisies Complete Petals in Black card, then using white card, die cut the Delicate Daisies-Open Petals.
Glue them together and stick them into position on the card.
Add small Black Dazzlers to the flower centres.
And there's the finished card!
I do apologise about the glare in the photos....I must have chosen the sunniest day of the year so far to make this one!
Well, that's all for this week...many thanks for stopping by and leaving comments, they are much appreciated.
I should be in Turkey while you're reading this....not long before we get home!
Until next time....have a happy, crafty week!
Good Morning All and a very Happy Tuesday!
With all the sunshine we've been having, I couldn't help but use the gorgeous Sunflower stamps designed by Johnathon Lockwood for Creative Expressions.
They come in an A5 set called "Elements-Flower Frames"
So without further ado, let's get started.....
Stamp the sunflower and sentiment "Sending You Hugs" with Black Archival Ink onto Coconut White Card. Heat emboss with Cosmic Shimmer Clear Powder.
Paint the flower with Shabby Shutters, Peeled Paint , Wild Honey and Mustard Seed Distress Inks.
Trim to size.
Stamp the single sunflowers randomly onto a piece of Coconut White card and paint as before.
Matt and layer onto Black Foundations Card.
Stamp the single leaves and one flower onto a panel of white card.
Paint using the same colours as before, then matt and layer.
Glue to the left side of the card.
Matt and layer the main image and attach to the card with 3d foam pads.
Tie a triple bow from Black Seam Binding. Spritz with water, scrunch and dry. Glue into position before adding a Pastel Green Dazzler to the centre.
And there's the finished card!
The stamps are such good quality that you get a wonderfully clear impression every time.
I hope you like the finished project.....it's bright and cheerful and I hope would cheer anyone up that's in need of a hug!
Many thanks for stopping by and leaving comments....while you're reading this, we'll be flying out to Greece to meet the ship we're working on for the next 2 weeks. When I say "we", I mean my very talented OH....I'm just going to roadie for him this time!
I'll still be posting every Tuesday, you don't get rid of me as easily as that!
I did promise that I would post instructions for the glittered background I demo'd at Ally Pally, that will be on here soon so please keep checking in.
Until next time, have a happy, crafty week!